Instructor note
10 min teaching
10 min exercises
Teaching Mechanics
Objectives
Understand the pros and cons of online teaching compared to in-person
Discuss practical aspects of teaching
Online vs in-person workshops
Challenges:
More difficult for learners to stay focused for a full day (“Zoom fatigue”).
More confusion and cognitive overload from watching and listening to instructor while typing along or solving exercises.
Networking and socialisation is much more difficult.
Group work takes more effort to prepare, to encourage interaction between learners.
Learners more often stay quiet.
Signaling problems or asking questions is more difficult.
Awkwardness during silences or when multiple people start talking at the same time.
Lack of non-verbal cues.
Benefits:
More geographically inclusive.
No travel costs.
Less environmental impact.
Possible for learners and teachers to participate in larger number of events.
More natural format for collaborative teaching.
Easier to scale up.
Addressing the challenges
Have you encountered any of the challenges listed above?
Do you have any ideas for how to solve them or reduce their effects?
Write down your suggestions in the shared workshop document.
A few ideas
Only teach half days.
Avoid cognitive overload by slowing down and including more “meta talk”.
Use icebreaker questions for general introductions and to encourage active participation.
Let learners introduce themselves in groups using breakout rooms.
Use shared workshop document for questions and answers and to signal problems.
Strongly recommend screen sharing and collaboration in breakout room exercises.
But what do learners actually think of online workshops compared to in-person workshops? Here’s how learners in ENCCS workshops replied to a post-workshop survey question about the online format:
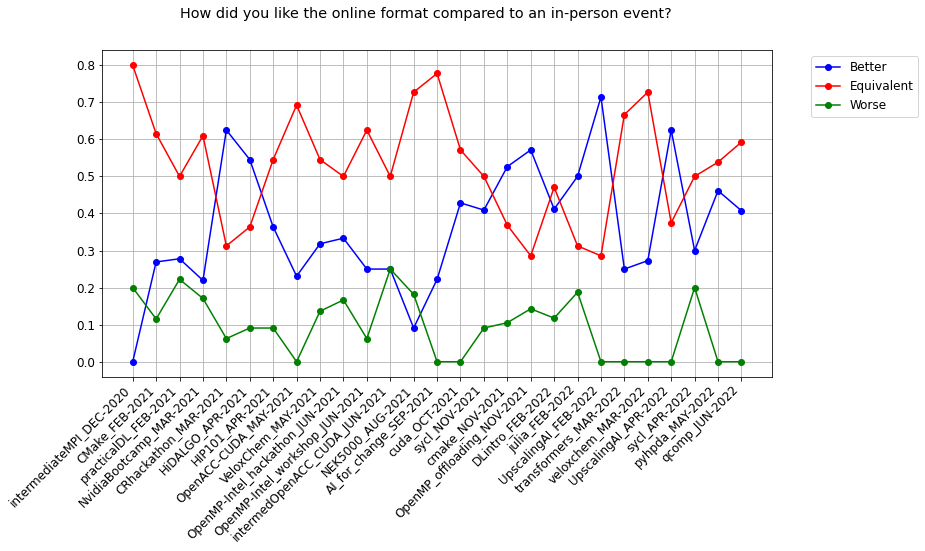
ENCCS post-workshop survey results.
However, the survey question is simple and the answers do not reveal any details about the pros and cons of online workshops perceived by the workshop participants.
Tooling
Callout
You can find more in-depth discussion on screen- and shell-sharing for teaching code-development online in CodeRefinery’s Train the trainer workshop material as well as the manual.
The mechanics of online (or in-person) teaching is all about the tools and visual aspects of teaching. It is important to plan and prepare these technical aspects before a workshop.
The learner has a lot more to think about than the instructor, so you need to minimize possible distractions and unnecessary weirdness.
A learner will often use only one small screen, limiting the number of things that they can focus on.
You are much faster than learners. You have to do things to slow yourself down.
Shell sharing
When doing any demonstration, there are difficulties:
If one misses something, you can’t rewind to see it – is there any way to catch up?
The learner must get oriented with the whole picture, while instructor knows precisely where to focus.
A good shell share has some of the following properties:
Large font
Shell history, available separately from the main shell window
Closely matches the type-along instructions
Simple examples:
Set up simple prompt:
$ export PS1='\n\w\$ '
Define a command to be executed before new prompt:
$ PROMPT_COMMAND="history -a"
In new terminal, print updates to history file:
$ tail -f -n0 ~/.bash_history
Set up simple prompt:
$ export PROMPT='%~ $ '
Define command to be executed just after a command has been read and is about to be executed:
$ preexec() { echo $1 >> ~/demos.out }
In new terminal, print updates to demos.out file:
$ tail -f ~/demos.out
One way to set up your shell with light background, large font, simple prompt and shell history.
Screen sharing
Many learners will have a smaller screen than you.
You should plan for learners with only one small screen.
A learner will need to focus on both your screen share and their work.
Sharing your entire screen is probably a bad idea if you want the learners to do anything at the same time.
If you constrict yourself, then your experience is more similar to that of a learner.
Vertical sharing:
Vertical share is when you share a vertical half of your screen.
This allows learners with one screen to display your screen side-by-side with their own applications.
Zoom provides a “Share a part of screen” that is good for this.
Example of vertical screen share with lesson material above and terminal below
Vertical screen sharing is also very appropriate when Jupyter notebooks are used.

Example of vertical screen share with lesson material in a Jupyter notebook in JupyterLab
Example of how a learner can arrange their screens. Instructor screenshare on the left, own windows on the right.
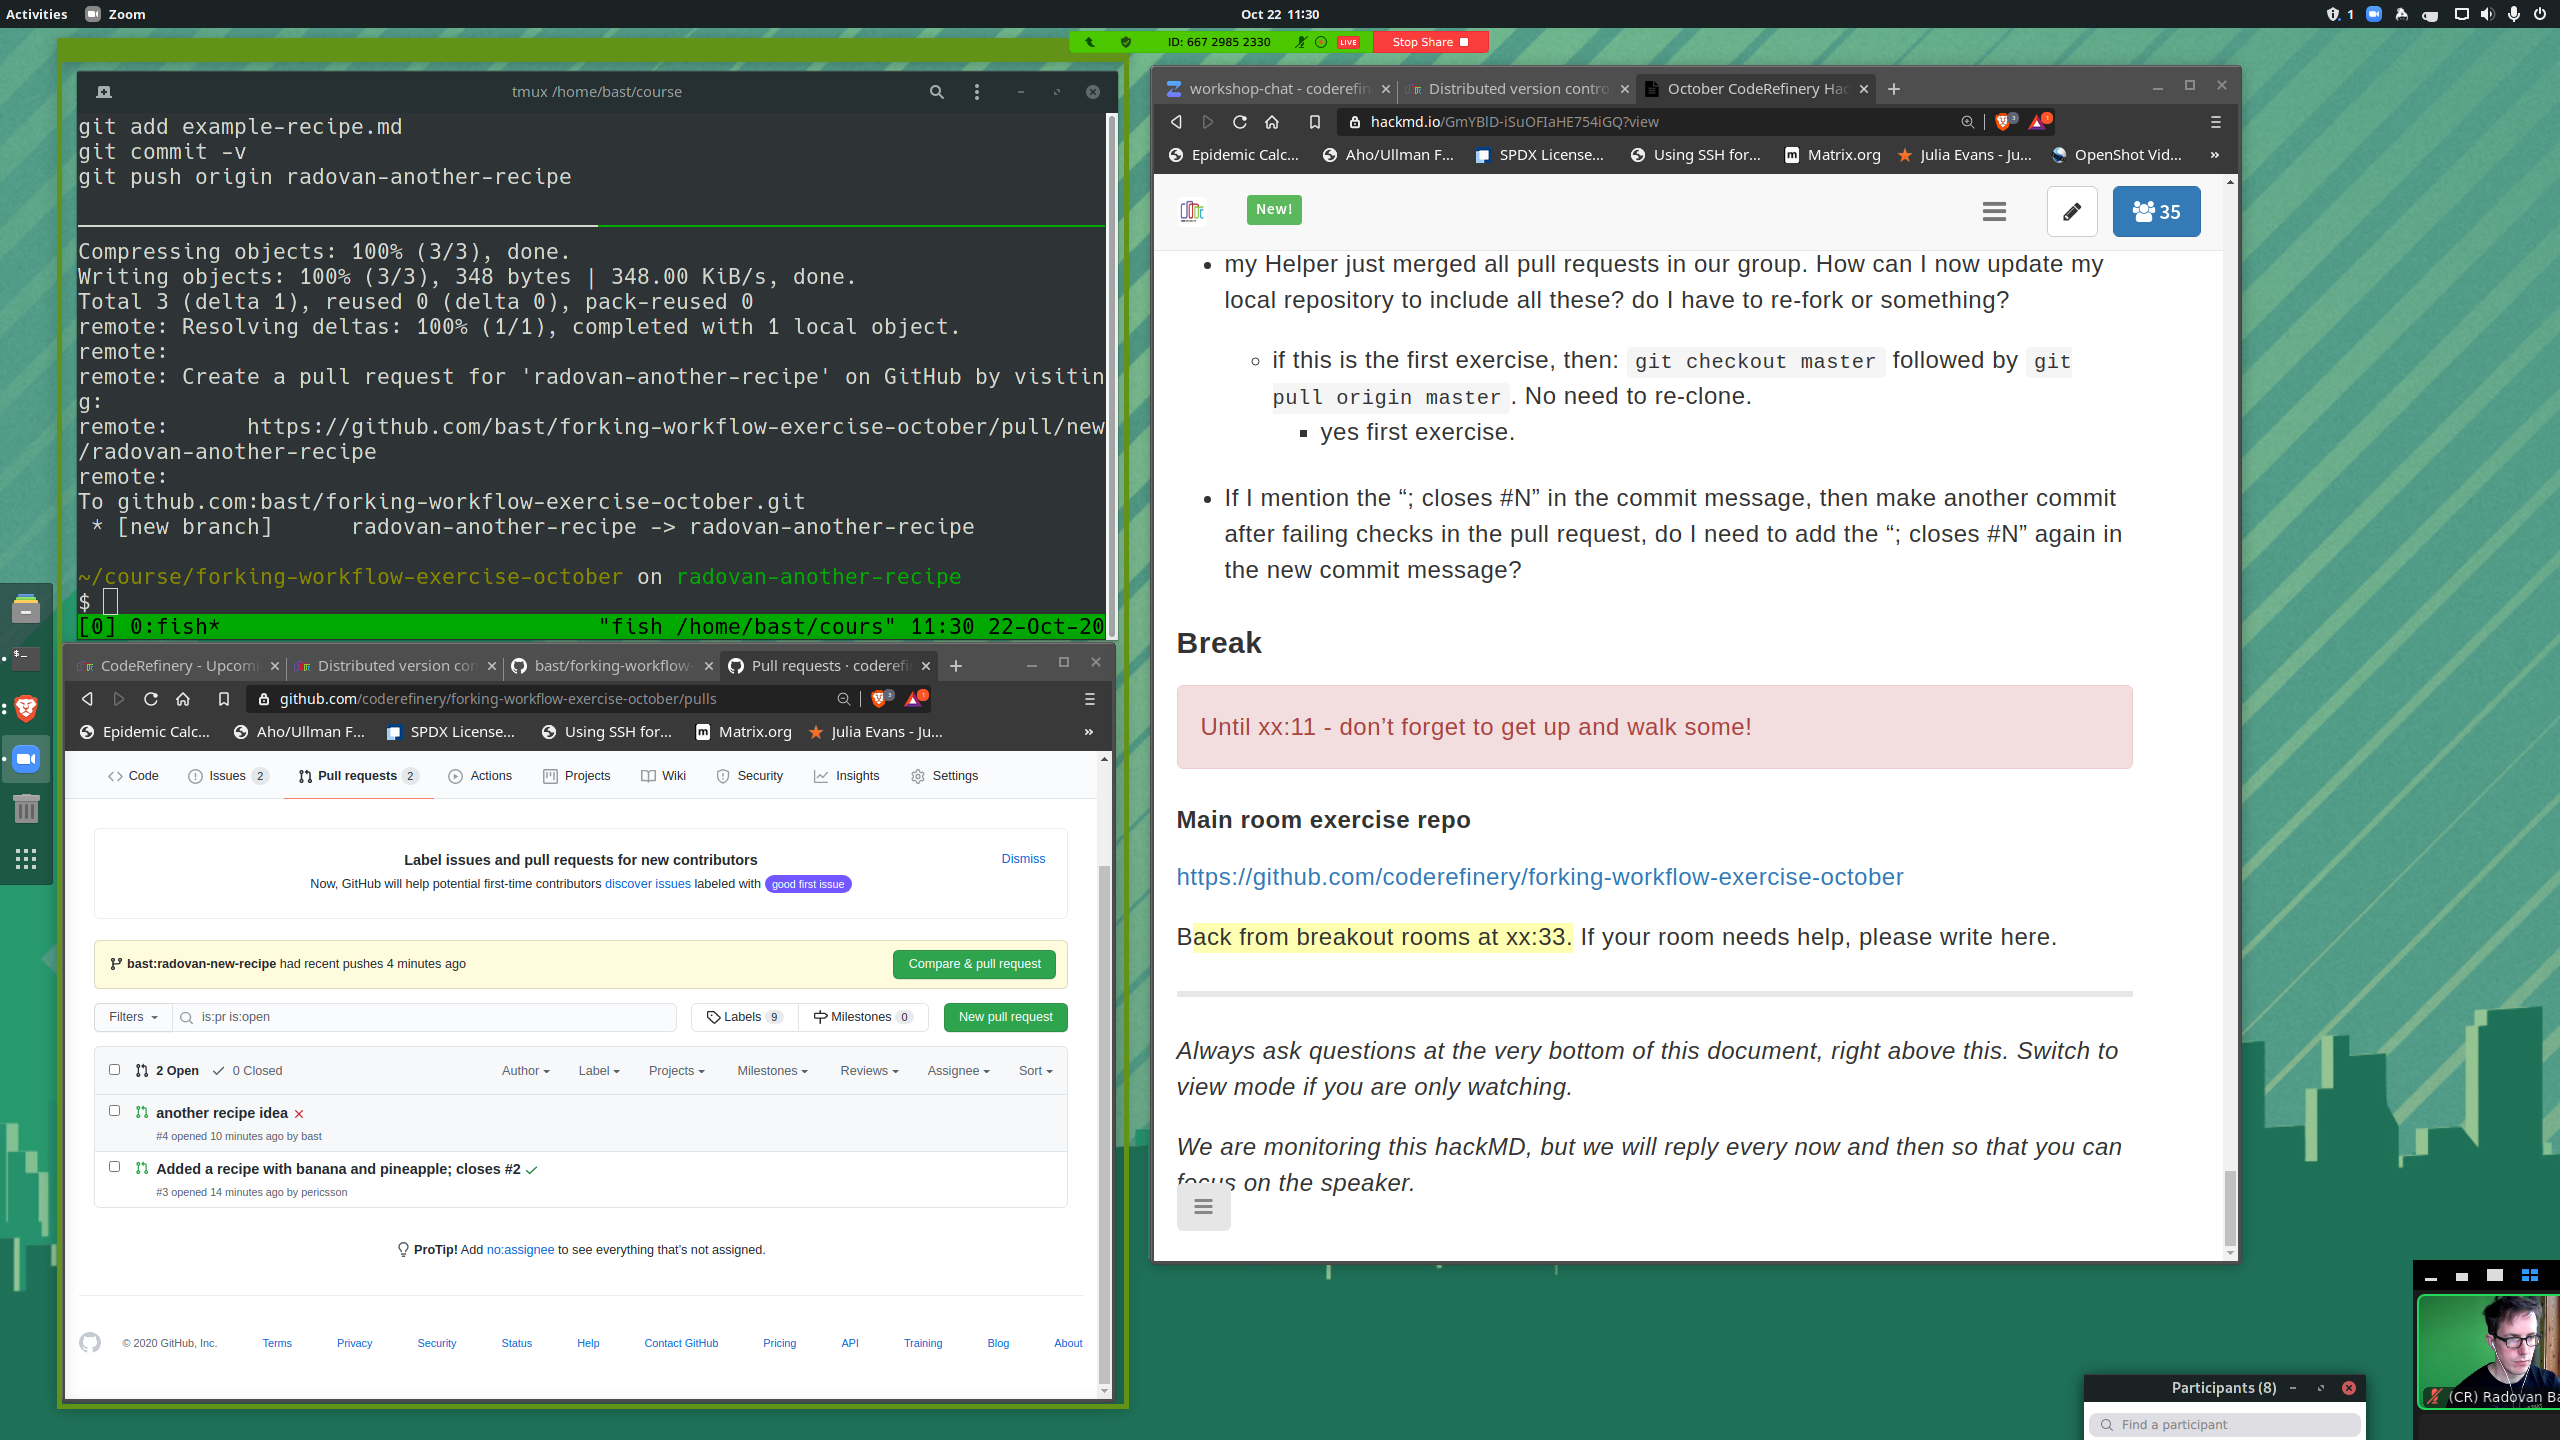
Example of how the instructor can arrange windows. Zoom is sharing a portion on the left, the right side is free for the shared document, teaching notes, chat with other instructors etc.
Breaking the ice
A shared workshop document is useful to get learners engaged in a workshop from the start, and also for breaking down social barriers and facilitating networking in groups.
Some strategies for icebreaker questions:
Use both social and scientific/professional icebreaker sessions.
Have breakout rooms in small groups to complete a small social task, multiple times with new groups.
Alternatively, start every day with an icebreaking activity in new breakout rooms to be used that day.
How to break the ice? (5 minutes)
In breakout rooms or through shared workshop document, discuss how one can create an engaging and inclusive environment which increases learner motivation.
Use your own past experiences, or brainstorm new methods.
Team teaching
Callout
You can find more about concepts of co-teaching and team teaching in CodeRefinery’s Train the trainer workshop material.
Demonstration-based teaching requires two different types of focus:
Doing the mechanical steps as a demonstration;
Explaining why you are doing it.
This is a lot for one person to keep in mind, so can multiple people work together for this? Team teaching idea:
One person is doing the demonstrations.
One person is giving the commentary about what is done or what is seen.
The lecture becomes a discussion between two people instead.
Co-teaching
Wikipedia: Co-teaching or team teaching is the division of labor between educators to plan, organize, instruct and make assessments on the same group of students, generally in the a common classroom, and often with a strong focus on those teaching as a team complementing one another’s particular skills or other strengths.
Advantages:
The course seems very interactive, much more so than expecting students to speak up. The co-teacher can take on the “voice of the audience”.
Shorter preparation time since co-teachers can rely on each other in unexpected situations.
One co-teacher can be effectively learning at the same time and thus acting as the “voice of the audience” in another way.
Great way to onboard new instructors – extensive training and preparation less needed.
More active minds means better ability to watch and react to other feedback, such as HackMD or chat.
Less workload – one person does not have to prepare perfectly, any uncertainty can usually be quickly answered by the other.
Disadvantages:
Requires two people’s time.
Requires coordination when preparing (slows down preparation somewhat).
Unfamiliar concept to most people.
Strategies
In reality, these strategies are mixed and matched even within a lesson, and there are many things between these:
One person gives lectures, one does the typing during demos.
“Interview”: One primarily doing the “teaching”, one guiding by asking questions, either as an interviewer or as a virtual learner.
Things that don’t work (are not team teaching):
Dividing up a lesson into parts, where each person gives different parts independently.
Workshop host and facilitator
Facilitation is a process for helping other people dealing with a process or reach an agreement or solution - without getting directly involved in the process, discussion, etc. oneself. It can also be seen as the art of moving a group of people through meetings, planning sessions, or training, and successfully achieving a specific goal.
Since training workshops are often delivered by multiple trainers, exercise leaders and helpers, it can be extremely valuable to have a workshop host who engages in facilitation activities throughout the workshop. This can include:
Providing a general introduction, welcome and description of the code of conduct at the beginning - setting the stage for a successful workshop.
Introduce all instructors and other contributors.
Introduce an ice-breaking activity to engage participants and establish a friendly and collaborative environment.
Give framing at the start of each section of the workshop and hand over the word to the relevant trainer.
Be observant to raised hands or other reactions in the audience, potential technical issues (poor audio, too small font size) and be prepared to jump in to raise issues to the trainer or invite questions.
Pay attention to the pace and quality of the training, and be prepared to ask for improvements in a welcoming way:
“I think this section was probably very complicated for most of our participants, would you mind going back and explaining again how you did X?”
“Sorry for interrupting, but this might be going too fast for those of us with limited background knowledge on this topic. Could you go a little slower?”
Make sure that there is at least a 10 minute break every hour. Encourage participants to stand up, stretch their legs, grab some water or hot drink.
Update shared workshop document with information about the structure of the workshop - add instructions for exercises and how long they’ll last, how long the breaks last, add headings from training material to remind learners where we are, etc.
Make sure that questions in shared workshop document are answered, either by text by trainers not currently teaching, or by interrupting the trainer.
Give frequent “meta talk” in between sessions to help learners connect the teaching with the workshop structure.
Be the voice of the audience - pointing out when something was difficult, when something didn’t work well, what a commonly encountered challenge might be etc.
Moderate discussions, tactfully interrupting dialogues that become too advanced or off-topic, and make sure that everyone gets heard.
Invite and encourage questions, asking questions oneself to lower the barrier (but don’t ask advanced questions!).
Invite anonymous feedback in the shared workshop document.
Workshop hosts engaging in these facilitation activities can thus provide the glue to tie all components of a workshop together, making the workshop feel more cohesive, inclusive, meaningful and enjoyable.
See also
Instructor introduction; has a lot of tips for new instructors, but also more things about the workshop.
Lesson preparation hints (more focused on in-person)