Introduction to CUDA
Hello, CUDA!
Let us start familiarizing ourselves with CUDA by writing a simple “Hello CUDA” program, which will query all available devices and print some information on them.
We will start with a basic .cpp code, change it so it will be compiled by CUDA compiler and do some CUDA API call, to see what devices are available.
Getting the information on available devices using CUDA API
#include <stdio.h>

int main()
{
    printf("I can see %d device(s) if the code is compiled with gcc:.\n", 0);
    return 0;
}
#include <stdio.h>

int main()
{
    int driverVersion = 0;
    cudaDriverGetVersion(&driverVersion);
    printf("CUDA driver: %d\n", driverVersion);

    int runtimeVersion = 0;
    cudaRuntimeGetVersion(&runtimeVersion);
    printf("CUDA runtime: %d\n", runtimeVersion);

    int         numDevices;
    cudaError_t stat = cudaGetDeviceCount(&numDevices);

    for (int i = 0; i < numDevices; i++)
    {
        cudaDeviceProp prop;
        stat = cudaGetDeviceProperties(&prop, i);

        printf("%d: %s, CC %d.%d, %d SMs running at %dMHz, %luMB\n", i, prop.name,
            prop.major, prop.minor,
            prop.multiProcessorCount,
            prop.clockRate/1000,
            prop.totalGlobalMem/1024/1024);
    }

    return 0;
}
#include <stdio.h>

// Beginning of GPU Architecture definitions
inline int _ConvertSMVer2Cores(int major, int minor) {
  // Defines for GPU Architecture types (using the SM version to determine
  // the # of cores per SM
  typedef struct {
    int SM;  // 0xMm (hexidecimal notation), M = SM Major version,
    // and m = SM minor version
    int Cores;
  } sSMtoCores;

  sSMtoCores nGpuArchCoresPerSM[] = {
      {0x30, 192},
      {0x32, 192},
      {0x35, 192},
      {0x37, 192},
      {0x50, 128},
      {0x52, 128},
      {0x53, 128},
      {0x60,  64},
      {0x61, 128},
      {0x62, 128},
      {0x70,  64},
      {0x72,  64},
      {0x75,  64},
      {0x80,  64},
      {0x86, 128},
      {-1, -1}};

  int index = 0;

  while (nGpuArchCoresPerSM[index].SM != -1) {
    if (nGpuArchCoresPerSM[index].SM == ((major << 4) + minor)) {
      return nGpuArchCoresPerSM[index].Cores;
    }

    index++;
  }
  return 0;
}

int main()
{
    int driverVersion = 0;
    cudaDriverGetVersion(&driverVersion);
    printf("CUDA driver: %d\n", driverVersion);

    int runtimeVersion = 0;
    cudaRuntimeGetVersion(&runtimeVersion);
    printf("CUDA runtime: %d\n", runtimeVersion);

    int         numDevices;
    cudaError_t stat = cudaGetDeviceCount(&numDevices);

    for (int i = 0; i < numDevices; i++)
    {
        cudaDeviceProp prop;
        stat = cudaGetDeviceProperties(&prop, i);

        printf("%d: %s, CC %d.%d, %dx%d=%d@%dMHz CUDA cores, %luMB\n", i, prop.name,
            prop.major, prop.minor,
            prop.multiProcessorCount, _ConvertSMVer2Cores(prop.major, prop.minor),
            prop.multiProcessorCount*_ConvertSMVer2Cores(prop.major, prop.minor), prop.clockRate/1000,
            prop.totalGlobalMem/1024/1024);

    }

    return 0;
}
We need the compiler to be aware that it is dealing with source file that may contain CUDA code. To do so, we change the extension of the file to
.cu. We will not be using the GPU yet, only checking if we have some available. To do so, we will be using the CUDA API functions. Changing the extension to.cuwill make sure that thenvcccompiler will add all the necessary includes and will be aware that the code can contain CUDA API calls.To get the number of devices we are going to use the
cudaGetDeviceCount(..)CUDA API function:__host____device__ cudaError_t cudaGetDeviceCount(int* numDevices)
The function calls the API and returns the number of the available devices in the address provided as a first argument. There are a couple of things to notice here. First, the function is defined with two CUDA specifiers
__host__and__device__. This means that it is available in both host and device code. Second, as most of CUDA calls, this function returnscudaError_tenumeration, which can contain a error message if something went wrong. In case of success,cudaSuccessis returned.Now that we know how many devices we have, we can cycle through them and get properties of each one. The device properties are contained in
cudaDevicePropstructure. This structure contains extensive information on the device (see cudaDeviceProp API), we are going to check its name (prop.name), major and minor compute capabilities (prop.majorandprop.minor), number of streaming processors (prop.multiProcessorCount), core clock and available memory (prop.totalGlobalMem).To populate the
cudaDevicePropstructure, one needs to callcudaGetDeviceProperties(..):__host__ cudaError_t cudaGetDeviceProperties(cudaDeviceProp* prop, int deviceId)
The function has a
__host__specifier, which means that one can not call it from the device code. It also returnscudaError_tstructure, which can becudaErrorInvalidDevicein case we are trying to get properties of a non-existing device (e.g. whendeviceIdis larger thannumDevices)Note that the total number of CUDA cores is not contained in
cudaDevicePropstructure. This is so, because different devices can have different number of CUDA cores per streaming module (multiprocessor). This number can by up to 192, depending on compute capabilities major and minor version of the device. The provided “extended” solution has a helper function from CUDA SDK examples, that can get this number depending onprop.majorandprop.minor.
Allocate memory, transfer data and execute kernels
In the next example we will be adding two vectors together. This will allow us to get familiar with basic CUDA API that are essential for writing code in CUDA.
Adding vectors using CUDA
#include <stdio.h>
#include <stdlib.h>
#include <algorithm>

void vecAdd(int numElements, const float* a, const float* b, float* c)
{
    for (int i = 0; i < numElements; i++)
    {
        c[i] = a[i] + b[i];
    }
}

int main()
{
    int numElements = 10000;

    float* a = (float*)calloc(numElements, sizeof(float));
    float* b = (float*)calloc(numElements, sizeof(float));
    float* c = (float*)calloc(numElements, sizeof(float));

    srand(1214134);
    for (int i = 0; i < numElements; i++)
    {
        a[i] = float(rand())/float(RAND_MAX + 1.0);
        b[i] = float(rand())/float(RAND_MAX + 1.0);
    }

    vecAdd(numElements, a, b, c);

    for (int i = 0; i < std::min(10, numElements); i++)
    {
        printf("%f + %f = %f\n", a[i], b[i], c[i]);
    }
    printf("...\n");

    free(a);
    free(b);
    free(c);

    return 0;
}
#include <stdio.h>
#include <stdlib.h>
#include <algorithm>


// Change the code here:
// This should be changed to GPU kernel definition
void vecAdd(int numElements, const float* a, const float* b, float* c)
{
    for (int i = 0; i < numElements; i++)
    {
        c[i] = a[i] + b[i];
    }
}

int main()
{
    int numElements = 10000;

    float* a = (float*)calloc(numElements, sizeof(float));
    float* b = (float*)calloc(numElements, sizeof(float));
    float* c = (float*)calloc(numElements, sizeof(float));

    srand(1214134);
    for (int i = 0; i < numElements; i++)
    {
        a[i] = float(rand())/float(RAND_MAX + 1.0);
        b[i] = float(rand())/float(RAND_MAX + 1.0);
    }

    // Insert your code here:
    // 1. Create GPU device buffers
    // 2. Copy input data from host to device (vectors a and b)
    // 3. Change the CPU function call to the GPU kernel call
    vecAdd(numElements, a, b, c);
    // 4. Copy the result back (vector c)

    for (int i = 0; i < std::min(10, numElements); i++)
    {
        printf("%f + %f = %f\n", a[i], b[i], c[i]);
    }
    printf("...\n");

    free(a);
    free(b);
    free(c);

    // Free GPU memory here

    return 0;
}
#include <stdio.h>
#include <stdlib.h>
#include <algorithm>

// Change the code here:
// This should be changed to GPU kernel definition
void vecAdd(int numElements, const float* a, const float* b, float* c)
{
    for (int i = 0; i < numElements; i++)
    {
        c[i] = a[i] + b[i];
    }
}

int main()
{
    int numElements = 10000;

    float* h_a = (float*)calloc(numElements, sizeof(float));
    float* h_b = (float*)calloc(numElements, sizeof(float));
    float* h_c = (float*)calloc(numElements, sizeof(float));

    srand(1214134);
    for (int i = 0; i < numElements; i++)
    {
        h_a[i] = float(rand())/float(RAND_MAX + 1.0);
        h_b[i] = float(rand())/float(RAND_MAX + 1.0);
    }

    srand(1214134);
    for (int i = 0; i < numElements; i++)
    {
        a[i] = float(rand())/float(RAND_MAX + 1.0);
        b[i] = float(rand())/float(RAND_MAX + 1.0);
    }

    // Insert your code here:

    // 1. Create GPU device buffers

    float* d_a;
    float* d_b;
    float* d_c;

    cudaMalloc((void**)&d_a, numElements*sizeof(float));
    cudaMalloc((void**)&d_b, numElements*sizeof(float));
    cudaMalloc((void**)&d_c, numElements*sizeof(float));

    // 2. Copy input data from host to device (vectors a and b)
    cudaMemcpy(d_a, h_a, numElements*sizeof(float), cudaMemcpyHostToDevice);
    cudaMemcpy(d_b, h_b, numElements*sizeof(float), cudaMemcpyHostToDevice);

    // 3. Change the CPU function call to the GPU kernel call
    vecAdd(numElements, a, b, c);

    // 4. Copy the result back (vector c)
    cudaMemcpy(h_c, d_c, numElements*sizeof(float), cudaMemcpyDeviceToHost);

    for (int i = 0; i < std::min(10, numElements); i++)
    {
        printf("%f + %f = %f\n", a[i], b[i], c[i]);
    }
    printf("...\n");

    free(a);
    free(b);
    free(c);

    return 0;
}
#include <stdio.h>
#include <stdlib.h>
#include <algorithm>

#define BLOCK_SIZE 256

__global__ void vecAdd(int numElements, const float* a, const float* b, float* c)
{
    int i = threadIdx.x + blockIdx.x*blockDim.x;
    if (i < numElements)
    {
        c[i] = a[i] + b[i];
    }
}

int main()
{
    int numElements = 10000;

    float* h_a = (float*)calloc(numElements, sizeof(float));
    float* h_b = (float*)calloc(numElements, sizeof(float));
    float* h_c = (float*)calloc(numElements, sizeof(float));

    srand(1214134);
    for (int i = 0; i < numElements; i++)
    {
        h_a[i] = float(rand())/float(RAND_MAX + 1.0);
        h_b[i] = float(rand())/float(RAND_MAX + 1.0);
    }

    float* d_a;
    float* d_b;
    float* d_c;

    cudaMalloc((void**)&d_a, numElements*sizeof(float));
    cudaMalloc((void**)&d_b, numElements*sizeof(float));
    cudaMalloc((void**)&d_c, numElements*sizeof(float));

    cudaMemcpy(d_a, h_a, numElements*sizeof(float), cudaMemcpyHostToDevice);
    cudaMemcpy(d_b, h_b, numElements*sizeof(float), cudaMemcpyHostToDevice);

    vecAdd<<<numElements/BLOCK_SIZE + 1, BLOCK_SIZE>>>(numElements, d_a, d_b, d_c);

    cudaMemcpy(h_c, d_c, numElements*sizeof(float), cudaMemcpyDeviceToHost);

    for (int i = 0; i < std::min(10, numElements); i++)
    {
        printf("%f + %f = %f\n", h_a[i], h_b[i], h_c[i]);
    }
    printf("...\n");

    free(h_a);
    free(h_b);
    free(h_c);

    cudaFree(d_a);
    cudaFree(d_b);
    cudaFree(d_c);

    return 0;
}
Familiarize yourself with the CPU version of the code.
Download or copy/paste the CUDA stub version. We are going to start working on it below.
The last two tabs contain intermediate version of the code, with all the GPU data management in place and a full solution. Feel free to use these codes for a reference.
Now that we know that there is a CUDA device available and we can execute simple code on it.
In CUDA, developer must control the data flow between host (CPU) and device (GPU) memory.
To do so, one must declare the buffers that will be located in the device memory.
It is usually convenient to “mirror” the host buffers, declaring and allocating buffers for the same data of the same size on both host and device, however this is not a requirement.
Note that in CUDA, device buffer is a basic pointer and it can be easily confused with the host pointer.
Using the device buffer on host most likely will lead to segmentation fault error, so one must keep track of where the buffers are located.
It is advisable to have the prefix that will indicate where the buffer is located, e.g. use h_ prefix for host memory and d_ prefix for device memory.
Declaration of the device buffer is as simple as it is for the host buffer. For instance, declaring host and device buffers for a vector of floating point values x should look something like this:
float* h_x;
float* d_x;
Note that we have not specified yet, where the buffers are located.
This is done when we are allocating the memory. On host it can be done by calling alloc(..) or calloc(..) function.
What is the difference between alloc(..) and calloc(..)?
Only
calloc(..)can be used for arrays.The difference is only in signatures, which makes
calloc(..)more convenient to use for arrays. Both initialize the memory.The difference is only in signatures, which makes
calloc(..)more convenient to use for arrays. Neither initialize the memory.Only
calloc(..)initializes memory with zeroes.
Solution
Using
calloc(..)ensures that the memory is set to zero values.
To allocate buffer in GPU memory, one has to call the CUDA API function cudaMalloc(..):
__host__ __device__ cudaError_t cudaMalloc(void** devPtr, size_t size)
We are now getting used to these function having access specifiers and return cudaError_t.
As the first arguments, the function takes a pointer to the buffer in the device memory.
The function that allocates size bytes, as specified by the second argument, and updates the provided device duffer by the address of this allocation.
Note that this function takes pointer to the buffer, which is itself a pointer.
This allows to update the pointer to where the memory is allocated.
To release the memory, cudaFree(..) function should be used:
__host__ __device__ cudaError_t cudaFree(void* devPtr)
After memory is allocated, we need to copy data from host to device buffer and back.
This is done using the cudaMemcpy(..) function, that has the following signature:
__host__cudaError_t cudaMemcpy(void* dst, const void* src, size_t count, cudaMemcpyKind kind)
Both copy to and from the device buffer are done using the same function and the direction of the copy is specifies by the last argument, which is cudaMemcpyKind enumeration.
The enumeration can take values cudaMemcpyHostToHost, cudaMemcpyHostToDevice, cudaMemcpyDeviceToHost, cudaMemcpyDeviceToDevice or cudaMemcpyDefault.
All but the last are self-explanatory.
Passing the cudaMemcpyDefault will make the API to deduce the direction of the transfer from pointer values, but require unified virtual addressing.
Second to last argument is the size of the data to be copied in bytes.
The first two arguments can be either host or device pointers, depending on the directionality of the transfer.
This is where using h_ and d_ prefixes come handy: this way we should only remember the order in which the destination and the source arguments are specified.
For instance, host to device copy call should look something like that:
cudaMemcpy(d_x, h_x, numElements*sizeof(float), cudaMemcpyHostToDevice);
The names of the buffers suggest that the first argument (destination) is the device buffer and the second argument is the host buffer (source). This means that we are executing host to device copy, which is specified byt the last argument. After the execution on the device is done, we have the data in the device memory and the results can be copied back to the host memory using:
cudaMemcpy(h_x, d_x, numElements*sizeof(float), cudaMemcpyDeviceToHost);
What will happen if we execute the code as it is (“Add GPU data management” tab above)?
It will not compile.
The output will be the same - we are still computing everything on the CPU.
The results will be zero.
The results can be anything.
Solution
The results can be anything. We are allocating the buffer for d_c, but don’t put any values in it.
cudaMalloc(..) works similarly to malloc: the memory is allocated, but the data is not updated.
So there may be some left-overs from different program at the address that we are using, although, likely it will be empty and contain zeroes.
We are finally ready to define the function, that will be executed on the device (usually called GPU kernel).
Kernels are defined by another function specifier, called __global__:
__global__ void gpu_kernel(..)
What __global__ essentially means is that the function should be called from the host code, but will be executed on the device.
Since this function will be executed in many threads, the return value must be void: otherwise it would not be clear which of the threads should do the return.
The rest of the function definition is the same as with any c function: its name has the same limitations as a normal c function, it can have any number of arguments of any type, it is even can be templated.
Since the call of the kernel function happens in the host code but it is executed on the device, this place in the code marks a transition from single-thread execution to a many-thread execution.
One can think of it being a loop, each step of which is executed simultaneously.
As in loop, one needs an index, to differentiate the threads.
Here it gets a little bit complicated and we need to step back a little and remember how the GPUs are organized on a hardware level.
The GPU contains several Streaming Modules (SMs, or multiprocessors), each with many compute units. Every compute unit can execute commands. So the entire GPU is first divided into streaming modules (or multiprocessors) and each multiprocessor contains many execution units. To reflect this hierarchy on a software level, threads are grouped in identically sized blocks. Each block is assigned into a streaming module for execution. This collection of the thread blocks is usually called “grid”, which also can be multi-dimensional.
Although it may seem a bit complicated at the beginning, the grouping of threads open extra opportunities for synchronization and data exchange. Since threads in a block are executed on a same SM, they can shared the data and can do fast communications. This can be leveraged when designing and optimizing the code for GPU execution, and we will touch this topic later.
Given that the threads on a GPU are organized in a hierarchical manner, the global index of a thread should be computed from its in-block index, the index of execution block and the execution block size. To get the global thread index, one can start the kernel function with:
__global__ void gpu_kernel(..)
{
   int i = threadIdx.x + blockIdx.x*blockDim.x;
}
Here, threadIdx.x, blockIdx.x and blockDim.x are internal variables that are always available inside the device function.
They are, respectively, index of thread in a block, index of the block and the size of the block.
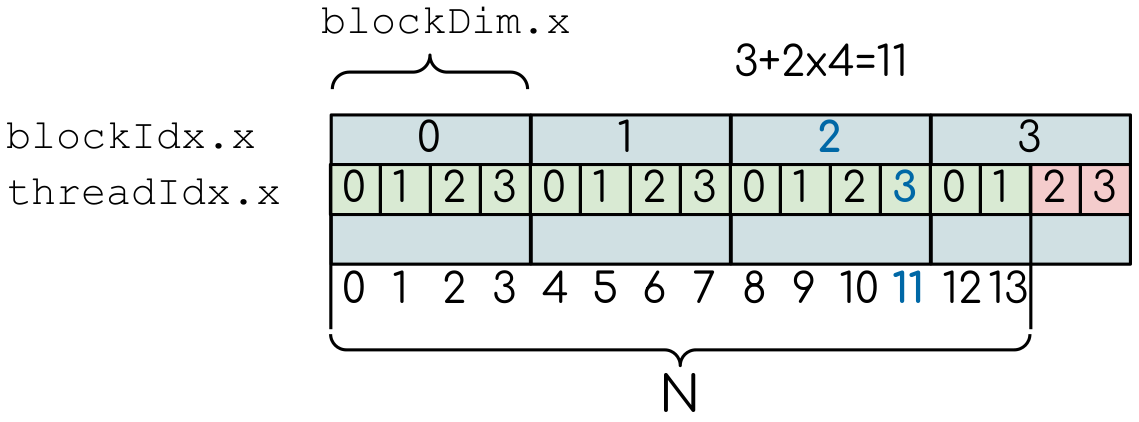
A simple example of the division of threads (green squares) in blocks (cyan rectangles). The equally-sized blocks contain four threads each. The thread index starts from zero in each block. Hence the “global” thread index should be computed from the thread index, block index and block size. This is explained for the thread #3 in block #2 (blue numbers). The total number of threads that are needes for the execution (N) can ofter not be a multiple of the block size and some of the threads will be idling or producing unused data (red blocks).
Here, we use one-dimensional arrangement of blocks and threads (hence, the .x).
More on multi-dimensional grids and CUDA built-in simple types later, for now we assume that the rest of the components equal to 1.
Since the index i is unique for each thread in an entire grid, it is usually called “global” index.
It is important to notice that the total number of threads in a grid is a multiple of the block size.
This is not necessary the case for the problem that we are solving: the length of the vectors we are summing can be non-divisible by selected block size.
So we either need to make sure that the threads with index large than the size of the vector don’t do anything, or add padding to the vectors.
We are going to use the former, more simple solution, by adding a conditional after the global thread index is computed:
__global__ void gpu_kernel(..)
{
   int i = threadIdx.x + blockIdx.x*blockDim.x;
   if (i < numElements)
   {
      ...
   }
}
Now the vectors can be addressed by the global index in the conditional the same way they are addressed in a loop of a CPU code. To have an access to the buffers, we need pass the device pointers to the kernel function, as we do with host pointers in the CPU code.
Now the kernel is defined, we can call it from the host code.
Since the kernel will be executed in a grid of threads, so the kernel launch should be supplied with the configuration of the grid.
In CUDA this is done by adding kernel cofiguration, <<<numBlocks, threadsPerBlock>>>, to the function call:
gpu_kernel<<<numBlocks, threadsPerBlock>>>(..)
Here, numBlocks is the total number of thread blocks in the grid, threadsPerBlock is the number of threads in a single block.
Note, that these values can be integers, or can be two-dimensional of three-dimensional vectors, if this is more suitable for the kernel.
It is natural to use the one-dimensional layout for the vector addition problem, which is itself one-dimensional.
In this case, the kernel configuration can be specified by two integer values.
The threadsPerBlock can be arbitrary chosen.
It should be larger that the number of CUDA cores in the SM to fully occupy the device, but lower than the limit of 1024 (see the technical specifications).
Values of 256 or 512 are frequently used.
Since one has to make sure that the total number of threads (i.e. numBlocks*threadsPerBlock is greater or equal to the size of the vector.
So numBlocks can be defined as numElements/threadsPerBlock + 1, where numElements is a number of elements in the vector.
Built-in CUDA vector types
CUDA has built-in vector types derived from basic integer and floating point types.
They are structures of 1, 2, 3 and 4 component that can be accessed through the fields x, y, z and w respectively.
For instance, float3 type has x, y and z types.
All these types come with a constructor function, for instance:
int2 make_int2(int x, int y);
Built-in data types are not only convenient to use in many cases, but can also improve the overall performance of the code, since the data in these types are aligned for optimal access pattern.
We already encountered the built-in data types when we were computing the global thread index in the previous example.
The threadIdx, blockIdx and blockDim variables are all of type uint3, which reflects the dimensionality of the grid of threads.
Computing scalar products of vectors using CUDA: using built-in vector types
#include <stdio.h>
#include <stdlib.h>
#include <algorithm>

#include <cuda_runtime.h>

void dot(int numElements, const float3* a, const float3* b, float* c)
{
    for (int i = 0; i < numElements; i++)
    {
        c[i] = a[i].x*b[i].x + a[i].y*b[i].y + a[i].z*b[i].z;
    }
}

int main()
{
    int numElements = 10000;

    float3* a = (float3*)calloc(numElements, sizeof(float3));
    float3* b = (float3*)calloc(numElements, sizeof(float3));
    float* c = (float*)calloc(numElements, sizeof(float));

    srand(1214134);
    for (int i = 0; i < numElements; i++)
    {
        a[i].x = float(rand())/float(RAND_MAX + 1.0);
        a[i].y = float(rand())/float(RAND_MAX + 1.0);
        a[i].z = float(rand())/float(RAND_MAX + 1.0);

        b[i].x = float(rand())/float(RAND_MAX + 1.0);
        b[i].y = float(rand())/float(RAND_MAX + 1.0);
        b[i].z = float(rand())/float(RAND_MAX + 1.0);
    }

    dot(numElements, a, b, c);

    for (int i = 0; i < std::min(10, numElements); i++)
    {
        printf("%f*%f + %f*%f + %f*%f = %f\n", a[i].x, b[i].x, a[i].y, b[i].y, a[i].z, b[i].z, c[i]);
    }
    printf("...\n");

    free(a);
    free(b);
    free(c);

    return 0;
}
#include <stdio.h>
#include <stdlib.h>
#include <algorithm>

// Change the code here:
// This should be changed to GPU kernel definition
void dot(int numElements, const float3* a, const float3* b, float* c)
{
    for (int i = 0; i < numElements; i++)
    {
        c[i] = a[i].x*b[i].x + a[i].y*b[i].y + a[i].z*b[i].z;
    }
}

int main()
{
    int numElements = 10000;

    float3* a = (float3*)calloc(numElements, sizeof(float3));
    float3* b = (float3*)calloc(numElements, sizeof(float3));
    float* c = (float*)calloc(numElements, sizeof(float));

    srand(1214134);
    for (int i = 0; i < numElements; i++)
    {
        a[i].x = float(rand())/float(RAND_MAX + 1.0);
        a[i].y = float(rand())/float(RAND_MAX + 1.0);
        a[i].z = float(rand())/float(RAND_MAX + 1.0);

        b[i].x = float(rand())/float(RAND_MAX + 1.0);
        b[i].y = float(rand())/float(RAND_MAX + 1.0);
        b[i].z = float(rand())/float(RAND_MAX + 1.0);
    }

    // Insert your code here:
    // 1. Create GPU device buffers
    // 2. Copy input data from host to device (vectors a and b)
    // 3. Change the CPU function call to the GPU kernel call
    dot(numElements, a, b, c);
    // 4. Copy the result back (vector c)

    for (int i = 0; i < std::min(10, numElements); i++)
    {
        printf("%f*%f + %f*%f + %f*%f = %f\n", a[i].x, b[i].x, a[i].y, b[i].y, a[i].z, b[i].z, c[i]);
    }
    printf("...\n");

    free(a);
    free(b);
    free(c);

    // Free GPU memory here

    return 0;
}
#include <stdio.h>
#include <stdlib.h>
#include <algorithm>

#define BLOCK_SIZE 256

__global__ void dot(int numElements, const float3* a, const float3* b, float* c)
{
    int i = threadIdx.x + blockIdx.x*blockDim.x;
    if (i < numElements)
    {
        c[i] = a[i].x*b[i].x + a[i].y*b[i].y + a[i].z*b[i].z;
    }
}

int main()
{
    int numElements = 10000;

    float3* h_a = (float3*)calloc(numElements, sizeof(float3));
    float3* h_b = (float3*)calloc(numElements, sizeof(float3));
    float* h_c = (float*)calloc(numElements, sizeof(float));

    srand(1214134);
    for (int i = 0; i < numElements; i++)
    {
        h_a[i].x = float(rand())/float(RAND_MAX + 1.0);
        h_a[i].y = float(rand())/float(RAND_MAX + 1.0);
        h_a[i].z = float(rand())/float(RAND_MAX + 1.0);

        h_b[i].x = float(rand())/float(RAND_MAX + 1.0);
        h_b[i].y = float(rand())/float(RAND_MAX + 1.0);
        h_b[i].z = float(rand())/float(RAND_MAX + 1.0);
    }

    float3* d_a;
    float3* d_b;
    float* d_c;

    cudaMalloc((void**)&d_a, numElements*sizeof(float3));
    cudaMalloc((void**)&d_b, numElements*sizeof(float3));
    cudaMalloc((void**)&d_c, numElements*sizeof(float));

    cudaMemcpy(d_a, h_a, numElements*sizeof(float3), cudaMemcpyHostToDevice);
    cudaMemcpy(d_b, h_b, numElements*sizeof(float3), cudaMemcpyHostToDevice);

    dot<<<numElements/BLOCK_SIZE + 1, BLOCK_SIZE>>>(numElements, d_a, d_b, d_c);

    cudaMemcpy(h_c, d_c, numElements*sizeof(float), cudaMemcpyDeviceToHost);

    for (int i = 0; i < std::min(10, numElements); i++)
    {
        printf("%f*%f + %f*%f + %f*%f = %f\n", h_a[i].x, h_b[i].x, h_a[i].y, h_b[i].y, h_a[i].z, h_b[i].z, h_c[i]);
    }
    printf("...\n");

    free(h_a);
    free(h_b);
    free(h_c);

    cudaFree(d_a);
    cudaFree(d_b);
    cudaFree(d_c);

    return 0;
}
Note that .cpp file has to both be compiled with nvcc and have #include <cuda_runtime.h> line.
This is because normal compiler is not aware of CUDA types.
Even though the CUDA compiler will pass the compilation to normal compiler, it is aware of the CUDA runtime and will be able to locate the CUDA runtime header.
The include is not needed in .cu files, since nvcc will automatically add it.
Compile and execute the CPU code to have reference values.
Start with CUDA version of vector add example.
Change the CPU and GPU data types for vectors
aandbtofloat3, do not forget to change the allocation and copy sizes.Initialize all three components (
.x,.yand.z) of vectorsh_aandh_b.Change the kernel so that it will compute scalar product of two vectors. Use CPU code as a reference.
Change the output print-out. Feel free to copy this part of the code from the CPU version. Do not forget to change the names of the vectors from
a,bandctoh_a,h_bandh_c
6. Compile and run. You should get the same results as in CPU version.
How can one make the code compile with gcc?
Add CUDA libraries to the LD_LIBRARY_PATH.
Add CUDA include folder to CPATH.
Both 1 and 2.
Define
struct float3 {float x, y, z;};
Solution
2 and 4 are correct answers.
float3 is a basic structure, so the inclusion of the header is all that is needed.
Alternatively, one can define similar structure, but it will collide with CUDA definition if this code will be used with CUDA.
The numBlocks and threadsPerBlock are of another special type — dim3, which is uint3, that initialized unspecified values to 1.
This makes it possible to define just one dimension for one-dimensional grid, as we did in the example above.
Having more than one dimension can be useful when working with two- or three-dimension space, or working with matrices, as in the following example.
Adding two matrices: using multi-dimensional grid
#include <stdio.h>
#include <stdlib.h>
#include <algorithm>

void matAdd(int width, int height, const float* A, const float* B, float* C)
{
    for (int i = 0; i < height; i++)
    {
        for (int j = 0; j < width; j++)
        {
            int index = i*width + j;
            C[index] = A[index] + B[index];
        }
    }
}

int main()
{
    int width = 1000;
    int height = 100;

    int numElements = width*height;

    float* A = (float*)calloc(numElements, sizeof(float));
    float* B = (float*)calloc(numElements, sizeof(float));
    float* C = (float*)calloc(numElements, sizeof(float));

    srand(1214134);
    for (int i = 0; i < numElements; i++)
    {
        A[i] = float(rand())/float(RAND_MAX + 1.0);
        B[i] = float(rand())/float(RAND_MAX + 1.0);
    }

    matAdd(width, height, A, B, C);

    for (int i = 0; i < std::min(5, height); i++)
    {
        for (int j = 0; j < std::min(5, width); j++)
        {
            int index = i*width + j;
            printf("%3.2f + %3.2f = %3.2f;\t", A[index], B[index], C[index]);
        }
        printf("...\n");
    }
    printf("...\n");

    free(A);
    free(B);
    free(C);

    return 0;
}
#include <stdio.h>
#include <stdlib.h>
#include <algorithm>

// Change the code here:
// This should be changed to GPU kernel definition
void matAdd(int width, int height, const float* A, const float* B, float* C)
{
    for (int i = 0; i < height; i++)
    {
        for (int j = 0; j < width; j++)
        {
            int index = i*width + j;
            C[index] = A[index] + B[index];
        }
    }
}

int main()
{
    int width = 1000;
    int height = 100;

    int numElements = width*height;

    float* A = (float*)calloc(numElements, sizeof(float));
    float* B = (float*)calloc(numElements, sizeof(float));
    float* C = (float*)calloc(numElements, sizeof(float));

    srand(1214134);
    for (int i = 0; i < numElements; i++)
    {
        A[i] = float(rand())/float(RAND_MAX + 1.0);
        B[i] = float(rand())/float(RAND_MAX + 1.0);
    }

    // Insert your code here:
    // 1. Create GPU device buffers
    // 2. Copy input data from host to device (matrixes A and B)
    // 3. Change the CPU function call to the GPU kernel call
    matAdd(width, height, A, B, C);
    // 4. Copy the result back (matrix C)

    for (int i = 0; i < std::min(5, height); i++)
    {
        for (int j = 0; j < std::min(5, width); j++)
        {
            int index = i*width + j;
            printf("%3.2f + %3.2f = %3.2f;\t", A[index], B[index], C[index]);
        }
        printf("...\n");
    }
    printf("...\n");

    free(A);
    free(B);
    free(C);

    // Free GPU memory here

    return 0;
}
#include <stdio.h>
#include <stdlib.h>
#include <algorithm>

#define BLOCK_SIZE_X 16
#define BLOCK_SIZE_Y 16

__global__ void matAdd(int width, int height, const float* A, const float* B, float* C)
{
    int i = threadIdx.x + blockIdx.x*blockDim.x;
    if (i < height)
    {
        int j = threadIdx.y + blockIdx.y*blockDim.y;
        if (j < width)
        {
            int index = i*width + j;
            C[index] = A[index] + B[index];
        }
    }
}

int main()
{
    int width = 1000;
    int height = 100;

    int numElements = width*height;

    float* h_A = (float*)calloc(numElements, sizeof(float));
    float* h_B = (float*)calloc(numElements, sizeof(float));
    float* h_C = (float*)calloc(numElements, sizeof(float));

    srand(1214134);
    for (int i = 0; i < numElements; i++)
    {
        h_A[i] = float(rand())/float(RAND_MAX + 1.0);
        h_B[i] = float(rand())/float(RAND_MAX + 1.0);
    }

    float* d_A;
    float* d_B;
    float* d_C;

    cudaMalloc((void**)&d_A, numElements*sizeof(float));
    cudaMalloc((void**)&d_B, numElements*sizeof(float));
    cudaMalloc((void**)&d_C, numElements*sizeof(float));

    cudaMemcpy(d_A, h_A, numElements*sizeof(float), cudaMemcpyHostToDevice);
    cudaMemcpy(d_B, h_B, numElements*sizeof(float), cudaMemcpyHostToDevice);

    dim3 numBlocks(height/BLOCK_SIZE_X + 1, width/BLOCK_SIZE_Y + 1);
    dim3 threadsPerBlock(BLOCK_SIZE_X, BLOCK_SIZE_Y);

    matAdd<<<numBlocks, threadsPerBlock>>>(width, height, d_A, d_B, d_C);

    cudaMemcpy(h_C, d_C, numElements*sizeof(float), cudaMemcpyDeviceToHost);

    for (int i = 0; i < std::min(5, height); i++)
    {
        for (int j = 0; j < std::min(5, width); j++)
        {
            int index = i*width + j;
            printf("%3.2f + %3.2f = %3.2f;\t", h_A[index], h_B[index], h_C[index]);
        }
        printf("...\n");
    }
    printf("...\n");

    free(h_A);
    free(h_B);
    free(h_C);

    cudaFree(d_A);
    cudaFree(d_B);
    cudaFree(d_C);

    return 0;
}
Compile and execute the CPU code to have reference values.
Use a stub code as your starting point.
Allocate buffers and copy data to GPU. Add device to host copy for the resulting matrix C.
Add
__global__to the kernel definition. Change the loop indices into thread indices. Use component.xfor the indexi(row) and.yforj(column). Add out-of-range conditionals.Change the function call to the kernel call. Since number of blocks and number of thread per block are of a type
dim3, you can use constructors with just two integers (e.g.dim3 threadsPerBlock(threadsPerBlockI, threadsPerBlockJ);). Note that the block will havethreadsPerBlockI*threadsPerBlockJthreads in total, so the values ofthreadsPerBlockIandthreadsPerBlockIshould be around16. Otherwise you may hit the API limit of number of threads per block.The result of the execution should be identical to the CPU code.