Setup
In order to follow type-along sessions and do exercises in this lesson you will need access to a computational resource with GPUs and installations of CUDA and compilers supporting OpenACC.
Where to run the exercises
During an ENCCS workshop the primary way to do the exercises is to use the cluster available to workshop participants. You can find instruction for the Tetralith cluster below.
If you do not have access to Tetralith but you have a user account on another GPU cluster you can use that instead - note however that you will need to adapt the instructions below according to the specifics of that cluster.
If you do not have access to any GPU cluster, you can follow the instructions below on how to use Google Colab.
Download example codes
The C and Fortran codes used for exercises in this lesson are contained in the same Git repository as the lesson material, so it is easiest to clone the repository by:
# if you have set up ssh keys on GitHub:
git clone git@github.com:ENCCS/OpenACC-CUDA-beginners.git
# otherwise:
git clone https://github.com/ENCCS/OpenACC-CUDA-beginners.git
After that, navigate to the examples directory:
cd OpenACC-CUDA-beginners/examples
OpenACC examples are contained in the OpenACC directory and CUDA examples
are in the CUDA directory.
Code examples on the main branch use PGI compilers, which are available on e.g.
the Tetralith cluster where the Nvidia HPC-SDK is installed. If you are on another
cluster which doesn’t have PGI compilers, or you are using Google Colab, you should
instead use the GNU version of the examples by changing to the colab_gcc branch:
git checkout colab_gcc
Running on Tetralith
How to log in
On any Linux or Mac OS system, you can log in to Tetralith using the following command in a terminal:
ssh <username>@tetralith.nsc.liu.se
On Windows systems, you need to install PuTTY to log in to Tetralith. More details can be found at https://www.nsc.liu.se/support/systems/tetralith-getting-started
Where to run jobs
When you log in on the Tetralith system, you can read the welcome messages (motd)
Welcome to NSC and Tetralith!

**** Project storage directories available to you:
/proj/snic2021-22-274/users/x_username

**** Documentation and getting help:
https://www.nsc.liu.se/support/systems/tetralith-getting-started/
https://www.nsc.liu.se/support

**** Useful commands
To see your active projects and CPU time usage: projinfo
To see available disk storage and usage: snicquota
To see your last jobs: lastjobs
Login to compute node to check running job: jobsh

To tweak job priorities, extend timelimits and reserve nodes: see
https://www.nsc.liu.se/support/batch-jobs/boost-tools/
In this workshop, we recommend that you use your project folder, i.e. /proj/snic2021-22-274/users/<your_username>, to do the exercises:
cd /proj/snic2021-22-274/users/<your_username>
In your project directory, download the exercises by cloning the lesson repository:
git clone https://github.com/ENCCS/OpenACC-CUDA-beginners.git
cd OpenACC-CUDA-beginners
Module system
As on other HPC centers, modules are used to maintain and use large set of programs on Tetralith at NSC. The main module commands are presented below.
module --help         General help with module commands

module avail          List the available modules and recommendations

module load ...       Load the selected modules into your session (can also write: module add)

module list           List your currently loaded modules (will be flushed at logout)

module rm ...         Remove selected modules from your session

module purge          Remove all loaded modules

module use ...        Use the modulefile which is not installed in default path
More information about module system at NSC can be found at https://www.nsc.liu.se/software/modules
Build scripts for many of the exercises in this lesson rely on the NVIDIA HPC SDK. To load this environment, type:
# Load the nvhpc module for using pgcc/pgf90 compiler
module use /proj/snic2021-22-274/hpc_sdk/modulefiles
module add nvhpc
How to edit files
If you are used to emacs or vim, you can use these on Tetralith. If you’re not
used to these text editors, a good choice is to use the nano editor. Type
nano <filename> to open a file. You can edit it as you want, save it by pressing
CTRL-o and exit by CTRL-x.
How to submit jobs
NSC uses the Slurm workload manager for job scheduling. You can either run program interactively:
# book a GPU compute node for 1 hour
# using project ID "snic2021-22-274" for the workshop
# and reservation "openacc-cuda-workshop-2021-05-04" for first day
interactive -n 1 -c 32 --gpus-per-task=1 -t 60 -A snic2021-22-274 --reservation=openacc-cuda-workshop-2021-05-04
...
or in batch mode with a job script:
sbatch job.sh
where the job script job.sh specifies the project ID, wall-clock time, number of node etc:
#!/bin/bash
#SBATCH --account=snic2021-22-274
#SBATCH --ntasks=1
#SBATCH --gpus-per-task=1
#SBATCH --time=00:15:00

module use /proj/snic2021-22-274/hpc_sdk/modulefiles
module load nvhpc

srun ./sum
Summary
Here is a sample process to run OpenACC program on Tetralith:
# login on Tetralith from local computer
local_computer $ ssh <your_username>@tetralith.nsc.liu.se
...
# use /proj/snic2021-22-274 folder
tetralith $ cd /proj/snic2021-22-274/users/<your_username>

# git the course material
tetralith $ git clone https://github.com/ENCCS/OpenACC-CUDA-beginners.git

# Use the example c code for vector addition
tetralith $ cd OpenACC-CUDA-beginners/examples/OpenACC/vector-sum/c

# Load the nvhpc module for using pgcc/pgf90 compiler
tetralith $ module use /proj/snic2021-22-274/hpc_sdk/modulefiles
tetralith $ module avail nvhpc

# compile the code (or direct use "make")
tetralith $ ./compile.sh

# check if the binary created
tetralith $ ls
 Makefile  compile.sh  job.sh  sum  sum.c

# run the binary "sum" on GPU,
tetralith $ sbatch job.sh
tetralith $ cat slurm-<job_id>.out
  Reduction sum: 1.2020569031119108

# or directly use "srun ... ./sum",
tetralith $ srun -n 1  --gpus-per-task=1 -t 10 -A snic2021-22-274 --reservation=openacc-cuda-workshop-2021-05-04 ./sum
Reduction sum: 1.2020569031119108

# or run interactive
tetralith $ interactive -n 1 -c 32 --gpus-per-task=1 -t 60 -A snic2021-22-274 --reservation=openacc-cuda-workshop-2021-05-04
salloc: job 13170656 has been allocated resources
salloc: Granted job allocation 13170656
srun: Step created for job 13170656

# Note: compute node has been assigned, check using command "hostname"
# should directly run the binary
n1141 $ ./sum
 Reduction sum: 1.2020569031119108
Running on Google Colab
If you do not have access to any HPC clusters with GPUs, a fallback option can be to use the Google Colab service where you can get access to GPUs in the cloud through Jupyter notebooks. Note: This requires that you have a Google account.
First click the “Open in Colab” button on https://colab.research.google.com/github/ENCCS/OpenACC-CUDA-beginners/blob/colab_gcc/examples/openACC_CUDA_colab.ipynb and enter your Google login information.
A Google-flavored Jupyter notebook should open on Colab which contains commands to get up and running on Colab. You need to press
SHIFT-ENTERon the cells to execute them.To get access to a GPU, click on the Runtime menu and select Change runtime type. Choose GPU as a Hardware accelerator. It might take a minute for your notebook to connect to a GPU.
To check whether a GPU has been connected to your session, run the code cell with the
!nvidia-smicommand by hittingSHIFT-ENTERon it.Click through the next few cells to clone the material, change to the colab branch and enter the exercise directories.
All work on Google Colab needs to be done through a Jupyter notebook. Here is how you can work on the exercises:
New code or text (markdown) cells can be created by clicking the “+Code” and “+Text” buttons, or through the keyboard shortcut
CTRL-m b. Cells can be deleted byCTRL-m d. Cells are executed by pressingSHIFT-ENTERor pressing the Play button. Pressing insteadALT-ENTERruns a cell and creates a new one underneath, whileCTRL-ENTERruns the cell and stays on the same cell.General shell commands can be entered into a code cell by prepending it with exclamation mark (e.g.
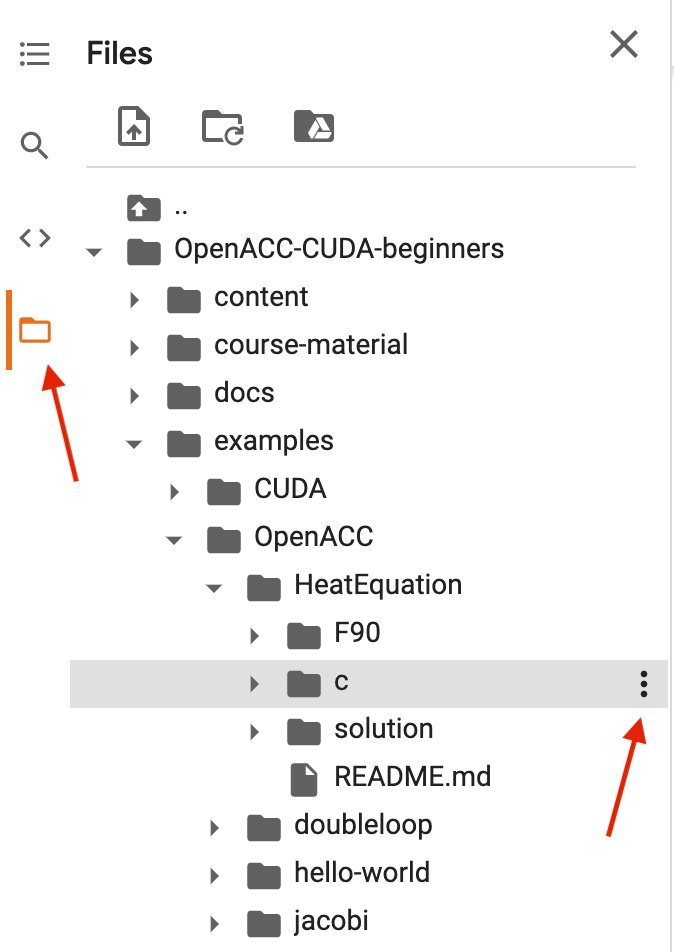
!ls). Some shell commands have corresponding “magic” commands (e.g. “%ls”), and some commands need to use the magic form. In particular, to change directory you need%cd some/path.Explore the directory structure by clicking on the Files symbol in the left-hand panel and navigate the OpenACC-CUDA-beginners / examples directory (see red arrow in image below).
In the file browser, navigate to the subfolder of the exercise you wish to work on and click on the three dots next to the directory and select “Copy path” (see red arrow in image below).
In a code cell, paste the path into a
%cdmagic command to change directory.After changing directory, you can for example compile code with Makefiles by
!make.You can open a text editor by double-clicking a file. This opens an editor on the right of the notebook and you can edit it there and save by hitting
CTRL-sor going through the File menu. Note: it is for some reason impossible to open files with.cuending in the Colab editor, so open instead the symbolic links with.cppending when working on these files.