Non-portable kernel-based models
Questions
How to program GPUs with CUDA and HIP?
What optimizations are possible when programming with CUDA and HIP?
Objectives
Be able to use CUDA and HIP to write basic codes
Understand how the execution is done and how to do optimizations
Instructor note
45 min teaching
30 min exercises
Fundamentals of GPU programming with CUDA and HIP
Unlike some cross-platform portability ecosystems, such as Alpaka, Kokkos, OpenCL, RAJA, and SYCL, which cater to multiple architectures, CUDA and HIP are solely focused on GPUs. They provide extensive libraries, APIs, and compiler toolchains that optimize code execution on NVIDIA GPUs (in the case of CUDA) and both NVIDIA and AMD GPUs (in the case of HIP). Because they are developed by the device producers, these programming models provide high-performance computing capabilities and offer advanced features like shared memory, thread synchronization, and memory management specific to GPU architectures.
CUDA, developed by NVIDIA, has gained significant popularity and is widely used for GPU programming. It offers a comprehensive ecosystem that includes not only the CUDA programming model but also a vast collection of GPU-accelerated libraries. Developers can write CUDA kernels using C++ and seamlessly integrate them into their applications to harness the massive parallelism of GPUs.
HIP, on the other hand, is an open-source project that aims to provide a more “portable” GPU programming interface. It allows developers to write GPU code in a syntax similar to CUDA and provides a translation layer that enables the same code to run on both NVIDIA and AMD GPUs. This approach minimizes the effort required to port CUDA code to different GPU architectures and provides flexibility for developers to target multiple platforms.
By being closely tied to the GPU hardware, CUDA and HIP provide a level of performance optimization that may not be achievable with cross-platform portability ecosystems. The libraries and toolchains offered by these programming models are specifically designed to exploit the capabilities of the underlying GPU architectures, enabling developers to achieve high performance.
Developers utilizing CUDA or HIP can tap into an extensive ecosystem of GPU-accelerated libraries, covering various domains, including linear algebra, signal processing, image processing, machine learning, and more. These libraries are highly optimized to take advantage of the parallelism and computational power offered by GPUs, allowing developers to accelerate their applications without having to implement complex algorithms from scratch.
As mentioned before, CUDA and HIP are very similar so it makes sense to cover both at the same time.
Comparison to portable kernel-based models
In code examples below, we will also show examples in the portable kernel-based frameworks Kokkos, SYCL and OpenCL, which will be covered in the next episode.
Hello World
Below we have the most basic example of CUDA and HIP, the “Hello World” program:
#include <cuda_runtime.h>
#include <cuda.h>
#include <stdio.h>

int main(void){
  int count, device;

  cudaGetDeviceCount(&count);
  cudaGetDevice(&device);

  printf("Hello! I'm GPU %d out of %d GPUs in total.\n", device, count);
  return 0;
}
#include <hip/hip_runtime.h>
#include <stdio.h>

int main(void){
  int count, device;

  hipGetDeviceCount(&count);
  hipGetDevice(&device);

  printf("Hello! I'm GPU %d out of %d GPUs in total.\n", device, count);
  return 0;
}
#include <Kokkos_Core.hpp>
#include <iostream>

int main() {
  Kokkos::initialize();

  int count = Kokkos::Cuda().concurrency();
  int device = Kokkos::Cuda().impl_internal_space_instance()->impl_internal_space_id();

  std::cout << "Hello! I'm GPU " << device << " out of " << count << " GPUs in total." << std::endl;

  Kokkos::finalize();

  return 0;
}
#include <CL/opencl.h>
#include <stdio.h>
int main(void) {
  cl_uint count;
  cl_platform_id platform;
  clGetPlatformIDs(1, &platform, NULL);

  cl_device_id device;
  clGetDeviceIDs(platform, CL_DEVICE_TYPE_GPU, 1, &device, &count);

  char deviceName[1024];
  clGetDeviceInfo(device, CL_DEVICE_NAME, sizeof(deviceName), deviceName, NULL);

  printf("Hello! I'm GPU %s out of %d GPUs in total.\n", deviceName, count);

  return 0;
}
#include <iostream>
#include <sycl/sycl.hpp>

int main() {
  auto gpu_devices = sycl::device::get_devices(sycl::info::device_type::gpu);
  auto count = gpu_devices.size();
  std::cout << "Hello! I'm using a SYCL device by "
            << gpu_devices[0].get_info<sycl::info::device::vendor>()
            << ">, the first of " << count << " devices." << std::endl;
  return 0;
}
In both versions, we include the necessary headers: cuda_runtime.h and cuda.h for CUDA, and hip_runtime.h for HIP. These headers provide the required functionality for GPU programming.
To retrieve information about the available devices, we use the functions <cuda/hip>GetDeviceCount and <cuda/hip>GetDevice. These functions allow us to determine the total number of GPUs and the index of the currently used device. In the code examples, we default to using device 0.
As an exercise, modify the “Hello World” code to explicitly use a specific GPU. Do this by using the <cuda/hip>SetDevice function, which allows to set the desired GPU device. Note that the device number provided has to be within the range of available devices, otherwise, the program may fail to run or produce unexpected results. To experiment with different GPUs, modify the code to include the following line before retrieving device information:
cudaSetDevice(deviceNumber); // For CUDA
hipSetDevice(deviceNumber); // For HIP
Replace deviceNumber with the desired GPU device index. Run the code with different device numbers to observe the output (more examples for the “Hello World” program are available in the content/examples/cuda-hip subdirectory of this lesson repository).
Vector addition
To demonstrate the fundamental features of CUDA/HIP programming, let’s begin with a straightforward task of element-wise vector addition. The code snippet below demonstrates how to utilize CUDA and HIP for efficiently executing this operation.
#include <stdio.h>
#include <cuda.h>
#include <cuda_runtime.h>
#include <math.h>

__global__ void vector_add(float *A, float *B, float *C, int n) {
  int tid = threadIdx.x + blockIdx.x * blockDim.x;
  if (tid < n) {
      C[tid] = A[tid] + B[tid];
  }
}

int main(void) {
  const int N = 10000;
  float *Ah, *Bh, *Ch, *Cref;
  float *Ad, *Bd, *Cd;
  int i;

  // Allocate the arrays on CPU
  Ah = (float*)malloc(N * sizeof(float));
  Bh = (float*)malloc(N * sizeof(float));
  Ch = (float*)malloc(N * sizeof(float));
  Cref = (float*)malloc(N * sizeof(float));

  // initialise data and calculate reference values on CPU
  for (i = 0; i < N; i++) {
      Ah[i] = sin(i) * 2.3;
      Bh[i] = cos(i) * 1.1;
      Cref[i] = Ah[i] + Bh[i];
  }

  // Allocate the arrays on GPU
  cudaMalloc((void**)&Ad, N * sizeof(float));
  cudaMalloc((void**)&Bd, N * sizeof(float));
  cudaMalloc((void**)&Cd, N * sizeof(float));

  // Transfer the data from CPU to GPU
  cudaMemcpy(Ad, Ah, sizeof(float) * N, cudaMemcpyHostToDevice);
  cudaMemcpy(Bd, Bh, sizeof(float) * N, cudaMemcpyHostToDevice);

  // define grid dimensions + launch the device kernel
  dim3 blocks, threads;
  threads = dim3(256, 1, 1);
  blocks = dim3((N + 256 - 1) / 256, 1, 1);

  // Launch Kernel
  vector_add<<<blocks, threads>>>(Ad, Bd, Cd, N);

  // copy results back to CPU
  cudaMemcpy(Ch, Cd, sizeof(float) * N, cudaMemcpyDeviceToHost);

  printf("reference: %f %f %f %f ... %f %f\n",
      Cref[0], Cref[1], Cref[2], Cref[3], Cref[N - 2], Cref[N - 1]);
  printf("   result: %f %f %f %f ... %f %f\n",
      Ch[0], Ch[1], Ch[2], Ch[3], Ch[N - 2], Ch[N - 1]);

  // confirm that results are correct
  float error = 0.0;
  float tolerance = 1e-6;
  float diff;
  for (i = 0; i < N; i++) {
      diff = fabs(Cref[i] - Ch[i]);
      if (diff > tolerance) {
          error += diff;
      }
  }
  printf("total error: %f\n", error);
  printf("  reference: %f at (42)\n", Cref[42]);
  printf("     result: %f at (42)\n", Ch[42]);

  // Free the GPU arrays
  cudaFree(Ad);
  cudaFree(Bd);
  cudaFree(Cd);

  // Free the CPU arrays
  free(Ah);
  free(Bh);
  free(Ch);
  free(Cref);

  return 0;
}
  #include <hip/hip_runtime.h>
  #include <stdio.h>
  #include <stlib.h>
  #include <math.h>

  __global__ void vector_add(float *A, float *B, float *C, int n){

    int tid = threadIdx.x + blockIdx.x * blockDim.x;
    if(tid<n){
      C[tid] = A[tid]+B[tid];
    }
 }

 int main(void){
   const int N = 10000;
   float *Ah, *Bh, *Ch, *Cref;
   float *Ad, *Bd, *Cd;

   // Allocate the arrays on CPU
   Ah =(float*)malloc(n * sizeof(float));
   Bh =(float*)malloc(n * sizeof(float));
   Ch =(float*)malloc(n * sizeof(float));
   Cref =(float*)malloc(n * sizeof(float));

   // initialise data and calculate reference values on CPU
   for (i=0; i < n; i++) {
     Ah[i] = sin(i) * 2.3;
     Bh[i] = cos(i) * 1.1;
     Cref[i] = Ah[i] + Bh[i];
   }

   // Allocate the arrays on GPU
   hipMalloc((void**)&Ad, N * sizeof(float));
   hipMalloc((void**)&Bd, N * sizeof(float));
   hipMalloc((void**)&Cd, N * sizeof(float));

   // Transfer the data from CPU to GPU
   hipMemcpy(Ad, Ah, sizeof(float) * n, hipMemcpyHostToDevice);
   hipMemcpy(Bd, Bh, sizeof(float) * n, hipMemcpyHostToDevice);

   // define grid dimensions + launch the device kernel
   dim3 blocks, threads;
   threads=dim3(256,1,1);
   blocks=dim3((N+256-1)/256,1,1);

   //Launch Kernel
   // use
   //hipLaunchKernelGGL(vector_add, blocks, threads, 0, 0, Ad, Bd, Cd, N); // or
   vector_add<<< blocks, threads,0,0>>(Ad, Bd, Cd, N);

   // copy results back to CPU
   hipMemcpy(Ch, Cd, sizeof(float) * N, hipMemcpyDeviceToHost);

   printf("reference: %f %f %f %f ... %f %f\n",
                 Cref[0], Cref[1], Cref[2], Cref[3], Cref[n-2], Cref[n-1]);
   printf("   result: %f %f %f %f ... %f %f\n",
                   Ch[0],   Ch[1],   Ch[2],   Ch[3],   Ch[n-2],   Ch[n-1]);

   // confirm that results are correct
   float error = 0.0;
   float tolerance = 1e-6;
   float diff;
   for (i=0; i < n; i++) {
     diff = abs(y_ref[i] - y[i]);
     if (diff > tolerance){
       error += diff;
     }
   }
  printf("total error: %f\n", error);
  printf("  reference: %f at (42)\n", Cref[42]);
  printf("     result: %f at (42)\n",    Ch[42]);

  // Free the GPU arrays
  hipFree(Ad);
  hipFree(Bd);
  hipFree(Cd);

  // Free the CPU arrays
  free(Ah);
  free(Bh);
  free(Ch);
  free(Cref);

  return 0;
}
// We're using C API here; examples with C++ API can be found in the "Portable kernel models" chapter
#include <stdio.h>
#include <stdlib.h>
#include <math.h>
#include <CL/cl.h>

#define N 10000

static const char* programSource =
   "__kernel void vector_add(__global const float* A, __global const float* B, __global float* C, int N) {\n"
   "    int tid = get_global_id(0);\n"
   "    if (tid < N) {\n"
   "        C[tid] = A[tid] + B[tid];\n"
   "    }\n"
   "}\n";

int main() {
   // Initialize data and calculate reference values on CPU
   float Ah[N], Bh[N], Ch[N], Cref[N];
   for (int i = 0; i < N; i++) {
      Ah[i] = sin(i) * 2.3f;
      Bh[i] = cos(i) * 1.1f;
      Ch[i] = 12.f;
      Cref[i] = Ah[i] + Bh[i];
   }

   // Use the default device
   cl_platform_id platform;
   clGetPlatformIDs(1, &platform, NULL);
   cl_device_id device;
   clGetDeviceIDs(platform, CL_DEVICE_TYPE_GPU, 1, &device, NULL);
   cl_context context = clCreateContext(NULL, 1, &device, NULL, NULL, NULL);
   cl_command_queue queue = clCreateCommandQueue(context, device, 0, NULL);

   // Build the kernel from string
   cl_program program = clCreateProgramWithSource(context, 1, &programSource, NULL, NULL);
   clBuildProgram(program, 1, &device, NULL, NULL, NULL);
   cl_kernel kernel = clCreateKernel(program, "vector_add", NULL);

   // Allocate the arrays on GPU
   cl_mem d_A = clCreateBuffer(context, CL_MEM_READ_ONLY, N * sizeof(float), NULL, NULL);
   cl_mem d_B = clCreateBuffer(context, CL_MEM_READ_ONLY, N * sizeof(float), NULL, NULL);
   cl_mem d_C = clCreateBuffer(context, CL_MEM_WRITE_ONLY, N * sizeof(float), NULL, NULL);

   clEnqueueWriteBuffer(queue, d_A, CL_TRUE, 0, N * sizeof(float), Ah, 0, NULL, NULL);
   clEnqueueWriteBuffer(queue, d_B, CL_TRUE, 0, N * sizeof(float), Bh, 0, NULL, NULL);

   // Set arguments and launch the kernel
   clSetKernelArg(kernel, 0, sizeof(cl_mem), &d_A);
   clSetKernelArg(kernel, 1, sizeof(cl_mem), &d_B);
   clSetKernelArg(kernel, 2, sizeof(cl_mem), &d_C);
   cl_int N_as_cl_int = N;
   clSetKernelArg(kernel, 3, sizeof(cl_int), &N_as_cl_int);
   size_t globalSize = N;
   clEnqueueNDRangeKernel(queue, kernel, 1, NULL, &globalSize, NULL, 0, NULL, NULL);

   // Copy the results back
   clEnqueueReadBuffer(queue, d_C, CL_TRUE, 0, N * sizeof(float), Ch, 0, NULL, NULL);

   // Print reference and result values
   printf("Reference: %f %f %f %f ... %f %f\n",
      Cref[0], Cref[1], Cref[2], Cref[3], Cref[N - 2], Cref[N - 1]);
   printf("Result   : %f %f %f %f ... %f %f\n",
      Ch[0], Ch[1], Ch[2], Ch[3], Ch[N - 2], Ch[N - 1]);

   // Compare results and calculate the total error
   float error = 0.0f;
   float tolerance = 1e-6f;
   for (int i = 0; i < N; i++) {
      float diff = fabs(Cref[i] - Ch[i]);
      if (diff > tolerance) {
            error += diff;
      }
   }

   printf("Total error: %f\n", error);
   printf("Reference:   %f at (42)\n", Cref[42]);
   printf("Result   :   %f at (42)\n", Ch[42]);

   clReleaseMemObject(d_A);
   clReleaseMemObject(d_B);
   clReleaseMemObject(d_C);
   clReleaseKernel(kernel);
   clReleaseProgram(program);
   clReleaseCommandQueue(queue);
   clReleaseContext(context);

   return 0;
}
#include <iostream>
#include <sycl/sycl.hpp>

int main() {
   const int N = 10000;
   // The queue will be executed on the best device in the system
   // We use in-order queue for simplicity
   sycl::queue q{{sycl::property::queue::in_order()}};

   std::vector<float> Ah(N);
   std::vector<float> Bh(N);
   std::vector<float> Ch(N);
   std::vector<float> Cref(N);

   // Initialize data and calculate reference values on CPU
   for (int i = 0; i < N; i++) {
      Ah[i] = std::sin(i) * 2.3f;
      Bh[i] = std::cos(i) * 1.1f;
      Cref[i] = Ah[i] + Bh[i];
   }

   // Allocate the arrays on GPU
   float *Ad = sycl::malloc_device<float>(N, q);
   float *Bd = sycl::malloc_device<float>(N, q);
   float *Cd = sycl::malloc_device<float>(N, q);

   q.copy<float>(Ah.data(), Ad, N);
   q.copy<float>(Bh.data(), Bd, N);

   // Define grid dimensions
   // We can specify the block size explicitly, but we don't have to
   sycl::range<1> global_size(N);
   q.submit([&](sycl::handler &h) {
      h.parallel_for<class VectorAdd>(global_size, [=](sycl::id<1> threadId) {
         int tid = threadId.get(0);
         Cd[tid] = Ad[tid] + Bd[tid];
      });
   });

   // Copy results back to CPU
   sycl::event eventCCopy = q.copy<float>(Cd, Ch.data(), N);
   // Wait for the copy to finish
   eventCCopy.wait();

   // Print reference and result values
   std::cout << "Reference: " << Cref[0] << " " << Cref[1] << " " << Cref[2]
               << " " << Cref[3] << " ... " << Cref[N - 2] << " " << Cref[N - 1]
               << std::endl;
   std::cout << "Result   : " << Ch[0] << " " << Ch[1] << " " << Ch[2] << " "
               << Ch[3] << " ... " << Ch[N - 2] << " " << Ch[N - 1] << std::endl;

   // Compare results and calculate the total error
   float error = 0.0f;
   float tolerance = 1e-6f;
   for (int i = 0; i < N; i++) {
      float diff = std::abs(Cref[i] - Ch[i]);
      if (diff > tolerance) {
         error += diff;
      }
   }

   std::cout << "Total error: " << error << std::endl;
   std::cout << "Reference:   " << Cref[42] << " at (42)" << std::endl;
   std::cout << "Result   :   " << Ch[42] << " at (42)" << std::endl;

   // Free the GPU memory
   sycl::free(Ad, q);
   sycl::free(Bd, q);
   sycl::free(Cd, q);

   return 0;
}
In this case, the CUDA and HIP codes are equivalent one to one so we will only refer to the CUDA version. The CUDA and HIP programming model are host centric programming models. The main program is executed on CPU and controls all the operations, memory allocations, data transfers between CPU and GPU, and launches the kernels to be executed on the GPU. The code starts with defining the GPU kernel function called vector_add with attribute ___global__. It takes three input arrays A, B, and C along with the array size n. The kernel function contains the actually code which is executed on the GPU by multiple threads in parallel.
Accelerators in general and GPUs in particular have their own dedicated memory separate from the system memory (this could change soon! see AMD MI300 and NVIDIA Hopper!). When programming for GPUs, there are two sets of pointers involved and it’s necessary to manage data movement between the host memory and the accelerator memory. Data needs to be explicitly copied from the host memory to the accelerator memory before it can be processed by the accelerator. Similarly, results or modified data may need to be copied back from the accelerator memory to the host memory to make them accessible to the CPU.
The main function of the code initializes the input arrays Ah, Bh on the CPU and computes the reference array Cref. It then allocates memory on the GPU for the input and output arrays Ad, Bd, and Cd using cudaMalloc (herein, h is for the host`(CPU) and `d for the ‘device’ (GPU)). The data is transferred from the CPU to the GPU using hipMemcpy, and then the GPU kernel is launched using the <<<.>>> syntax. All kernels launch are asynchronous. After launch the control returns to the main() and the code proceeds to the next instructions.
After the kernel execution, the result array Cd is copied back to the CPU using cudaMemcpy. The code then prints the reference and result arrays, calculates the error by comparing the reference and result arrays. Finally, the GPU and CPU memory are deallocated using cudaFree and free functions, respectively.
The host functions cudaSetDevice, cudaMalloc, cudaMemcpy, and cudaFree are blocking, i.e. the code does not continues to next instructions until the operations are completed. However this is not the default behaviour, for many operations there are asynchrounous equivalents and there are as well many library calls return the control to the main() after calling. This allows the developers to launch independent operations and overlap them.
In short, this code demonstrates how to utilize the CUDA and HIP to perform vector addition on a GPU, showcasing the steps involved in allocating memory, transferring data between the CPU and GPU, launching a kernel function, and handling the results. It serves as a starting point for GPU-accelerated computations using CUDA and HIP. (more examples for the “vector (array) addition” program are available at https://github.com/ENCCS/gpu-programming/tree/main/content/examples)
In order to practice the concepts shown above, edit the skeleton code in the repository and the code corresponding to setting the device, memory allocations and transfers, and the kernel execution.
Vector Addition with Unified Memory
For a while already GPUs support unified memory, which allows to use the same pointer for both CPU and GPU data. This simplifies developing codes by removing the explicit data transfers. The data resides on CPU until it is needed on GPU or vice-versa. However the data transfers still happens “under the hood” and the developer needs to construct the code to avoid unnecessary transfers. Below one can see the modified vector addition codes:
#include <stdio.h>
#include <cuda.h>
#include <cuda_runtime.h>
#include <math.h>

__global__ void vector_add(float *A, float *B, float *C, int n) {
  int tid = threadIdx.x + blockIdx.x * blockDim.x;
  if (tid < n) {
      C[tid] = A[tid] + B[tid];
  }
}

int main(void) {
  const int N = 10000;
  float *Ah, *Bh, *Ch, *Cref;
  int i;

  // Allocate the arrays using Unified Memory
  cudaMallocManaged(&Ah, N * sizeof(float));
  cudaMallocManaged(&Bh, N * sizeof(float));
  cudaMallocManaged(&Ch, N * sizeof(float));
  cudaMallocManaged(&Cref, N * sizeof(float));


  // initialise data and calculate reference values on CPU
  for (i = 0; i < N; i++) {
      Ah[i] = sin(i) * 2.3;
      Bh[i] = cos(i) * 1.1;
      Cref[i] = Ah[i] + Bh[i];
  }

  // define grid dimensions
  dim3 blocks, threads;
  threads = dim3(256, 1, 1);
  blocks = dim3((N + 256 - 1) / 256, 1, 1);

  // Launch Kernel
  vector_add<<<blocks, threads>>>(Ah, Bh, Ch, N);
  cudaDeviceSynchronize(); // Wait for the kernel to complete

  //At this point we want to access the data on CPU
  printf("reference: %f %f %f %f ... %f %f\n",
      Cref[0], Cref[1], Cref[2], Cref[3], Cref[N - 2], Cref[N - 1]);
  printf("   result: %f %f %f %f ... %f %f\n",
      Ch[0], Ch[1], Ch[2], Ch[3], Ch[N - 2], Ch[N - 1]);

  // confirm that results are correct
  float error = 0.0;
  float tolerance = 1e-6;
  float diff;
  for (i = 0; i < N; i++) {
      diff = fabs(Cref[i] - Ch[i]);
      if (diff > tolerance) {
          error += diff;
      }
  }
  printf("total error: %f\n", error);
  printf("  reference: %f at (42)\n", Cref[42]);
  printf("     result: %f at (42)\n", Ch[42]);

  // Free the GPU arrays
  cudaFree(Ah);
  cudaFree(Bh);
  cudaFree(Ch);
  cudaFree(Cref);

  return 0;
}
#include <hip/hip_runtime.h>
#include <stdio.h>
#include <math.h>

__global__ void vector_add(float *A, float *B, float *C, int n) {
   int tid = threadIdx.x + blockIdx.x * blockDim.x;
   if (tid < n) {
     C[tid] = A[tid] + B[tid];
  }
}

int main(void) {
  const int N = 10000;
  float *Ah, *Bh, *Ch, *Cref;
  // Allocate the arrays using Unified Memory
  hipMallocManaged((void **)&Ah, N * sizeof(float));
  hipMallocManaged((void **)&Bh, N * sizeof(float));
  hipMallocManaged((void **)&Ch, N * sizeof(float));
  hipMallocManaged((void **)&Cref, N * sizeof(float));

  // Initialize data and calculate reference values on CPU
  for (int i = 0; i < N; i++) {
    Ah[i] = sin(i) * 2.3;
    Bh[i] = cos(i) * 1.1;
    Cref[i] = Ah[i] + Bh[i];
  }
  // All data at this point is on CPU

  // Define grid dimensions + launch the device kernel
  dim3 blocks, threads;
  threads = dim3(256, 1, 1);
  blocks = dim3((N + 256 - 1) / 256, 1, 1);

  //Launch Kernel
  // use
  //hipLaunchKernelGGL(vector_add, blocks, threads, 0, 0, Ah, Bh, Ch, N); // or
  vector_add<<<blocks, threads>>>(Ah, Bh, Ch, N);
  hipDeviceSynchronize(); // Wait for the kernel to complete

  // At this point we want to access the data on the CPU
  printf("reference: %f %f %f %f ... %f %f\n",
        Cref[0], Cref[1], Cref[2], Cref[3], Cref[N - 2], Cref[N - 1]);
  printf("   result: %f %f %f %f ... %f %f\n",
        Ch[0], Ch[1], Ch[2], Ch[3], Ch[N - 2], Ch[N - 1]);

  // Confirm that results are correct
  float error = 0.0;
  float tolerance = 1e-6;
  float diff;
  for (int i = 0; i < N; i++) {
  diff = fabs(Cref[i] - Ch[i]);
    if (diff > tolerance) {
      error += diff;
    }
  }
  printf("total error: %f\n", error);
  printf("  reference: %f at (42)\n", Cref[42]);
  printf("     result: %f at (42)\n", Ch[42]);

  // Free the Unified Memory arrays
  hipFree(Ah);
  hipFree(Bh);
  hipFree(Ch);
  hipFree(Cref);

  return 0;
}
#include <iostream>
#include <sycl/sycl.hpp>

int main() {
   const int N = 10000;
   // The queue will be executed on the best device in the system
   // We use in-order queue for simplicity
   sycl::queue q{{sycl::property::queue::in_order()}};

   std::vector<float> Cref(N);

   // Allocate the shared arrays
   float *A = sycl::malloc_shared<float>(N, q);
   float *B = sycl::malloc_shared<float>(N, q);
   float *C = sycl::malloc_shared<float>(N, q);

   // Initialize data and calculate reference values on CPU
   for (int i = 0; i < N; i++) {
      A[i] = std::sin(i) * 2.3f;
      B[i] = std::cos(i) * 1.1f;
      Cref[i] = A[i] + B[i];
   }

   // Define grid dimensions
   // We can specify the block size explicitly, but we don't have to
   sycl::range<1> global_size(N);
   q.submit([&](sycl::handler &h) {
      h.parallel_for<class VectorAdd>(global_size, [=](sycl::id<1> threadId) {
         int tid = threadId.get(0);
         C[tid] = A[tid] + B[tid];
      });
      }).wait(); // Wait for the kernel to finish

   // Print reference and result values
   std::cout << "Reference: " << Cref[0] << " " << Cref[1] << " " << Cref[2]
               << " " << Cref[3] << " ... " << Cref[N - 2] << " " << Cref[N - 1]
               << std::endl;
   std::cout << "Result   : " << C[0] << " " << C[1] << " " << C[2] << " "
               << C[3] << " ... " << C[N - 2] << " " << C[N - 1] << std::endl;

   // Compare results and calculate the total error
   float error = 0.0f;
   float tolerance = 1e-6f;
   for (int i = 0; i < N; i++) {
      float diff = std::abs(Cref[i] - C[i]);
      if (diff > tolerance) {
         error += diff;
      }
   }

   std::cout << "Total error: " << error << std::endl;
   std::cout << "Reference:   " << Cref[42] << " at (42)" << std::endl;
   std::cout << "Result   :   " << C[42] << " at (42)" << std::endl;

   // Free the shared memory
   sycl::free(A, q);
   sycl::free(B, q);
   sycl::free(C, q);

   return 0;
}
Now the arrays Ah, Bh, Ch, and Cref are using cudaMallocManaged to allocate Unified Memory. The vector_add kernel is launched by passing these Unified Memory pointers directly. After the kernel launch, cudaDeviceSynchronize is used to wait for the kernel to complete execution. Finally, cudaFree is used to free the Unified Memory arrays. The Unified Memory allows for transparent data migration between CPU and GPU, eliminating the need for explicit data transfers.
As an exercise modify the skeleton code for vector addition to use Unified Memory.
Basics - In short
CUDA is developed by NVIDIA, while HIP is an open-source project (from AMD) for multi-platform GPU programming.
CUDA and HIP are GPU-focused programming models for optimized code execution on NVIDIA and AMD GPUs.
CUDA and HIP are similar, allowing developers to write GPU code in a syntax similar to CUDA and target multiple platforms.
CUDA and HIP are programming models focused solely on GPUs
CUDA and HIP offer high-performance computing capabilities and advanced features specific to GPU architectures, such as shared memory and memory management.
They provide highly GPU-accelerated libraries in various domains like linear algebra, signal processing, image processing, and machine learning.
Programming for GPUs involves managing data movement between host and accelerator memory.
Unified Memory simplifies data transfers by using the same pointer for CPU and GPU data, but code optimization is still necessary.
Memory Optimizations
Vector addition is a relatively simple, straight forward case. Each thread reads data from memory, does an addition and then saves the result. Two adjacent threads access memory location in memory close to each other. Also the data is used only once. In practice this not the case. Also sometimes the same data is used several times resulting in additional memory accesses.
Memory optimization is one of the most important type of optimization done to efficiently use the GPUs. Before looking how it is done in practice let’s revisit some basic concepts about GPUs and execution model.
GPUs are comprised many light cores, the so-called Streaming Processors (SP) in CUDA, which are physically group together in units, i.e. Streaming Multi-Processors (SMP) in CUDA architecture (note that in AMD the equivalent is called Computing Units, while in Intel GPUs they are Execution Units). The work is done on GPUs by launching many threads each executing an instance of the same kernel. The order of execution is not defined, and the threads can only exchange information in specific conditions. Because of the way the SPs are grouped the threads are also grouped in blocks. Each block is assigned to an SMP, and can not be splitted. An SMP can have more than block residing at a moment, however there is no communications between the threads in different blocks. In addition to the SPs, each SMP contains very fast memory which in CUDA is referred to as shared memory. The threads in a block can read and write to the shared memory and use it as a user controlled cache. One thread can for example write to a location in the shared memory while another thread in the same block can read and use that data. In order to be sure that all threads in the block completed writing __syncthreads() function has to be used to make the threads in the block wait until all of them reached the specific place in the kernel. Another important aspect in the GPU programming model is that the threads in the block are not executed independently. The threads in a block are physically grouped in warps of size 32 in NVIDIA devices or wavefronts of size 32 or 64 in AMD devices (depending on device architecture). Intel devices are notable in that the warp size, called SIMD width, is highly configurable, with typical possible values of 8, 16, or 32 (depends on the hardware). All memory accesses of the global GPU memory are done per warp. When data is needed for some calculations a warp loads from the GPU memory blocks of specific size (64 or 128 Bytes). These operation is very expensive, it has a latency of hundreds of cycles. This means that the threads in a warp should work with elements of the data located close in the memory. In the vector addition two threads near each other, of index tid and tid+1, access elements adjacent in the GPU memory.
The shared memory can be used to improve performance in two ways. It is possible to avoid extra reads from the memory when several threads in the same block need the same data (see stencil code) or it can be used to improve the memory access patterns like in the case of matrix transpose.
Memory, Execution - In short
GPUs consist of streaming processors (SPs) grouped together in units, such as Streaming Multi-Processors (SMPs) in CUDA architecture.
Work on GPUs is done by launching threads, with each thread executing an instance of the same kernel, and the execution order is not defined.
Threads are organized into blocks, assigned to an SMP, and cannot be split, and there is no communication between threads in different blocks.
Each SMP contains shared memory, which acts as a user-controlled cache for threads within a block, allowing efficient data sharing and synchronization.
The shared memory can be used to avoid extra memory reads when multiple threads in the same block need the same data or to improve memory access patterns, such as in matrix transpose operations.
Memory accesses from global GPU memory are performed per warp (groups of threads), and loading data from GPU memory has high latency.
To optimize memory access, threads within a warp should work with adjacent elements in memory to reduce latency.
Proper utilization of shared memory can improve performance by reducing memory reads and enhancing memory access patterns.
Matrix Transpose
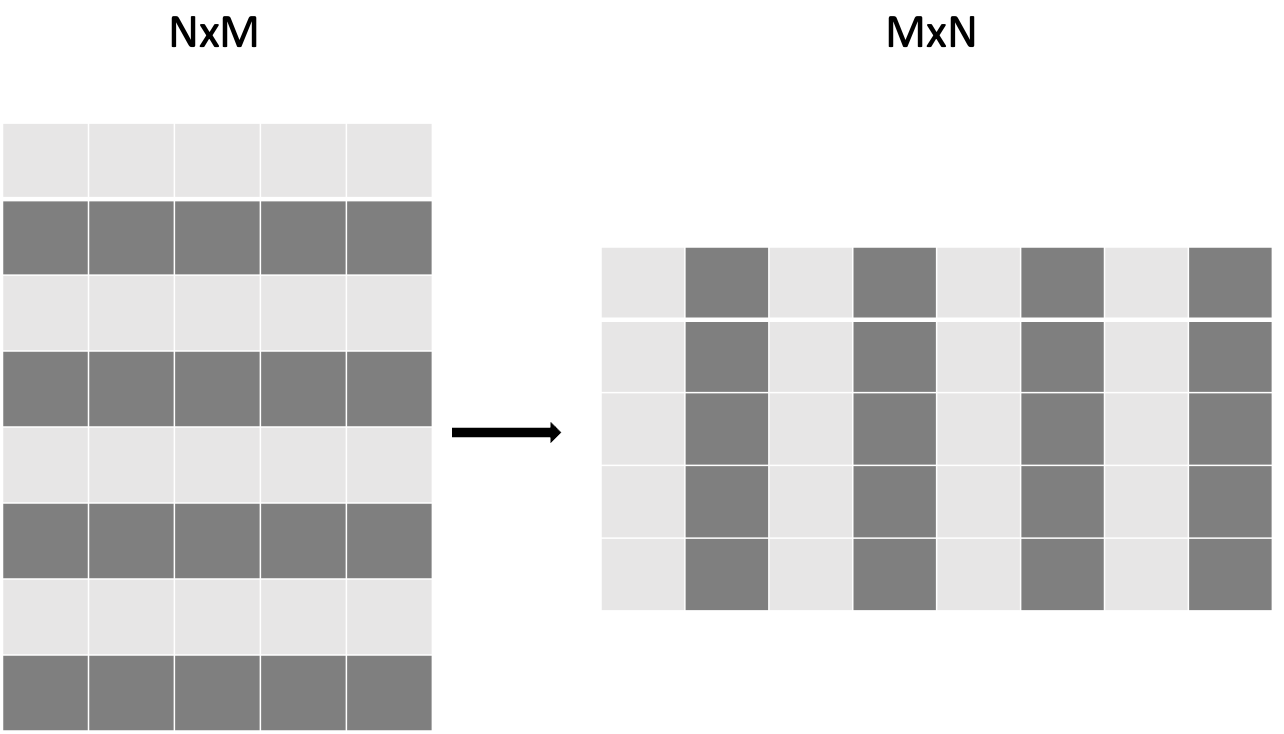
Matrix transpose is a classic example where shared memory can significantly improve the performance. The use of shared memory reduces global memory accesses and exploits the high bandwidth and low latency of shared memory.
First as a reference we use a simple kernel which copy the data from one array to the other.
#include <stdio.h>
#include <cuda.h>
#include <cuda_runtime.h>
#include <math.h>
#include <cstdlib>
#include <vector>

const static int width = 4096;
const static int height = 4096;

__global__ void copy_kernel(float *in, float *out, int width, int height) {
    int x_index = blockIdx.x * tile_dim + threadIdx.x;
    int y_index = blockIdx.y * tile_dim + threadIdx.y;

    int index = y_index * width + x_index;

    out[index] = in[index];
}

int main() {
   std::vector<float> matrix_in;
   std::vector<float> matrix_out;

   matrix_in.resize(width * height);
   matrix_out.resize(width * height);

   for (int i = 0; i < width * height; i++) {
     matrix_in[i] = (float)rand() / (float)RAND_MAX;
   }

   float *d_in,*d_out;

   cudaMalloc((void **)&d_in, width * height * sizeof(float));
   cudaMalloc((void **)&d_out, width * height * sizeof(float));

   cudaMemcpy(d_in, matrix_in.data(), width * height * sizeof(float),
          hipMemcpyHostToDevice);

   printf("Setup complete. Launching kernel \n");
   int block_x = width / tile_dim;
   int block_y = height / tile_dim;

   // Create events
   cudaEvent_t start_kernel_event;
   cudaEventCreate(&start_kernel_event);
   cudaEvent_t end_kernel_event;
   cudaEventCreate(&end_kernel_event);

   printf("Warm up the gpu!\n");
   for(int i=1;i<=10;i++){
      copy_kernel<<<dim3(block_x, block_y),dim3(tile_dim, tile_dim)>>>(d_in, d_out, width,height);
   }

   cudaEventRecord(start_kernel_event, 0);

   for(int i=1;i<=10;i++){
      copy_kernel<<<dim3(block_x, block_y),dim3(tile_dim, tile_dim)>>>(d_in, d_out, width,height);
   }

  cudaEventRecord(end_kernel_event, 0);
  cudaEventSynchronize(end_kernel_event);

  cudaDeviceSynchronize();
  float time_kernel;
  cudaEventElapsedTime(&time_kernel, start_kernel_event, end_kernel_event);

  printf("Kernel execution complete \n");
  printf("Event timings:\n");
  printf("  %.6f ms - copy \n  Bandwidth %.6f GB/s\n", time_kernel/10, 2.0*10000*(((double)(width)*      (double)height)*sizeof(float))/(time_kernel*1024*1024*1024));

  cudaMemcpy(matrix_out.data(), d_out, width * height * sizeof(float),
             hipMemcpyDeviceToHost);

  return 0;
}
#include <hip/hip_runtime.h>

#include <cstdlib>
#include <vector>

const static int width = 4096;
const static int height = 4096;

__global__ void copy_kernel(float *in, float *out, int width, int height) {
    int x_index = blockIdx.x * tile_dim + threadIdx.x;
    int y_index = blockIdx.y * tile_dim + threadIdx.y;

    int index = y_index * width + x_index;

    out[index] = in[index];
}

int main() {
   std::vector<float> matrix_in;
   std::vector<float> matrix_out;

   matrix_in.resize(width * height);
   matrix_out.resize(width * height);

   for (int i = 0; i < width * height; i++) {
     matrix_in[i] = (float)rand() / (float)RAND_MAX;
   }

   float *d_in,*d_out;

   hipMalloc((void **)&d_in, width * height * sizeof(float));
   hipMalloc((void **)&d_out, width * height * sizeof(float));

   hipMemcpy(d_in, matrix_in.data(), width * height * sizeof(float),
          hipMemcpyHostToDevice);

   printf("Setup complete. Launching kernel \n");
   int block_x = width / tile_dim;
   int block_y = height / tile_dim;

   // Create events
   hipEvent_t start_kernel_event;
   hipEventCreate(&start_kernel_event);
   hipEvent_t end_kernel_event;
   hipEventCreate(&end_kernel_event);

   printf("Warm up the gpu!\n");
   for(int i=1;i<=10;i++){
      copy_kernel<<<dim3(block_x, block_y),dim3(tile_dim, tile_dim)>>>(d_in, d_out, width,height);
   }

   hipEventRecord(start_kernel_event, 0);

   for(int i=1;i<=10;i++){
      copy_kernel<<<dim3(block_x, block_y),dim3(tile_dim, tile_dim)>>>(d_in, d_out, width,height);
   }

  hipEventRecord(end_kernel_event, 0);
  hipEventSynchronize(end_kernel_event);

  hipDeviceSynchronize();
  float time_kernel;
  hipEventElapsedTime(&time_kernel, start_kernel_event, end_kernel_event);

  printf("Kernel execution complete \n");
  printf("Event timings:\n");
  printf("  %.6f ms - copy \n  Bandwidth %.6f GB/s\n", time_kernel/10, 2.0*10000*(((double)(width)*      (double)height)*sizeof(float))/(time_kernel*1024*1024*1024));

  hipMemcpy(matrix_out.data(), d_out, width * height * sizeof(float),
             hipMemcpyDeviceToHost);

  return 0;
}
#include <sycl/sycl.hpp>
#include <vector>

const static int width = 4096;
const static int height = 4096;
const static int tile_dim = 16;

// Instead of defining kernel lambda at the place of submission,
// we can define it here:
auto copyKernel(const float *in, float *out, int width, int height) {
   return [=](sycl::nd_item<2> item) {
      int x_index = item.get_global_id(1);
      int y_index = item.get_global_id(0);
      int index = y_index * width + x_index;
      out[index] = in[index];
   };
}

int main() {
   std::vector<float> matrix_in(width * height);
   std::vector<float> matrix_out(width * height);

   for (int i = 0; i < width * height; i++) {
      matrix_in[i] = (float)rand() / (float)RAND_MAX;
   }

   // Create queue on the default device with profiling enabled
   sycl::queue queue{{sycl::property::queue::in_order(),
                        sycl::property::queue::enable_profiling()}};

   float *d_in = sycl::malloc_device<float>(width * height, queue);
   float *d_out = sycl::malloc_device<float>(width * height, queue);

   queue.copy<float>(matrix_in.data(), d_in, width * height);
   queue.wait();

   printf("Setup complete. Launching kernel\n");
   sycl::range<2> global_size{height, width}, local_size{tile_dim, tile_dim};
   sycl::nd_range<2> kernel_range{global_size, local_size};

   // Create events
   printf("Warm up the GPU!\n");
   for (int i = 0; i < 10; i++) {
      queue.submit([&](sycl::handler &cgh) {
         cgh.parallel_for(kernel_range, copyKernel(d_in, d_out, width, height));
      });
   }

   // Unlike in CUDA or HIP, for SYCL we have to store all events
   std::vector<sycl::event> kernel_events;
   for (int i = 0; i < 10; i++) {
      sycl::event kernel_event = queue.submit([&](sycl::handler &cgh) {
         cgh.parallel_for(kernel_range, copyKernel(d_in, d_out, width, height));
      });
      kernel_events.push_back(kernel_event);
   }

   queue.wait();

   auto first_kernel_started =
         kernel_events.front().get_profiling_info<sycl::info::event_profiling::command_start>();
   auto last_kernel_ended =
         kernel_events.back().get_profiling_info<sycl::info::event_profiling::command_end>();
   double total_kernel_time_ns = static_cast<double>(last_kernel_ended - first_kernel_started);
   double time_kernels = total_kernel_time_ns / 1e6; // convert ns to ms
   double bandwidth = 2.0 * 10000 *
                        (((double)(width) * (double)height) * sizeof(float)) /
                        (time_kernels * 1024 * 1024 * 1024);

   printf("Kernel execution complete\n");
   printf("Event timings:\n");
   printf("  %.6lf ms - copy\n  Bandwidth %.6lf GB/s\n", time_kernels / 10, bandwidth);

   sycl::free(d_in, queue);
   sycl::free(d_out, queue);
   return 0;
}
We note that this code does not do any calculations. Each thread reads one element and then writes it to another locations. By measuring the execution time of the kernel we can compute the effective bandwidth achieve by this kernel. We can measure the time using rocprof or cuda/hip events. On a NVIDIA V100 GPU this code achieves 717 GB/s out of the theoretical peak 900 GB/s.
Now we do the first iteration of the code, a naive transpose. The reads have a nice coalesced access pattern, but the writing is now very inefficient.
 __global__ void transpose_naive_kernel(float *in, float *out, int width, int height) {
    int x_index = blockIdx.x * tile_dim + threadIdx.x;
    int y_index = blockIdx.y * tile_dim + threadIdx.y;

    int in_index = y_index * width + x_index;
    int out_index = x_index * height + y_index;

   out[out_index] = in[in_index];
}
auto transposeKernel(const float *in, float *out, int width, int height) {
   return [=](sycl::nd_item<2> item) {
      int x_index = item.get_global_id(1);
      int y_index = item.get_global_id(0);
      int in_index = y_index * width + x_index;
      int out_index = x_index * height + y_index;
      out[out_index] = in[in_index];
   };
}
Checking the index in_index we see that two adjacent threads (threadIx.x, threadIdx.x+1) access location in memory near each other. However the writes are not. Threads access data which in a strided way. Two adjacent threads access data separated by height elements. This practically results in 32 memory operations, however due to under the hood optimizations the achieved bandwidth is 311 GB/s.
We can improve the code by reading the data in a coalesced way, save it in the shared memory row by row and then write in the global memory column by column.
  const static int tile_dim = 16;

  __global__ void transpose_SM_kernel(float *in, float *out, int width, int height) {
    __shared__ float tile[tile_dim][tile_dim];

    int x_tile_index = blockIdx.x * tile_dim;
    int y_tile_index = blockIdx.y * tile_dim;

    int in_index =(y_tile_index + threadIdx.y) * width + (x_tile_index + threadIdx.x);
    int out_index =(x_tile_index + threadIdx.y) * height + (y_tile_index + threadIdx.x);

    tile[threadIdx.y][threadIdx.x] = in[in_index];

    __syncthreads();

   out[out_index] = tile[threadIdx.x][threadIdx.y];
}
auto transposeKernel(sycl::handler &cgh, const float *in, float *out, int width, int height) { sycl::local_accessor<float, 1> tile{{tile_dim * tile_dim}, cgh}; return [=](sycl::nd_item<2> item) { int x_tile_index = item.get_group(1) * tile_dim; int y_tile_index = item.get_group(0) * tile_dim; int x_local_index = item.get_local_id(1); int y_local_index = item.get_local_id(0); int in_index = (y_tile_index + y_local_index) * width + (x_tile_index + x_local_index); int out_index = (x_tile_index + y_local_index) * width + (y_tile_index + x_local_index); tile[y_local_index * tile_dim + x_local_index] = in[in_index]; item.barrier(); out[out_index] = tile[x_local_index * tile_dim + y_local_index]; }; } /* Since allocating shared memory in SYCL requires sycl::handler, when calling parallel_for, * an additional parameter must be passed: * cgh.parallel_for(kernel_range, transposeKernel(cgh, d_in, d_out, width, height)); */
We define a tile_dim constant to determine the size of the shared memory tile. The matrix transpose kernel uses a 2D grid of thread blocks, where each thread block operates on a tile_dim x tile_dim tile of the input matrix.
The kernel first loads data from the global memory into the shared memory tile. Each thread loads a single element from the input matrix into the shared memory tile. Then, a __syncthreads() barrier ensures that all threads have finished loading data into shared memory before proceeding.
Next, the kernel writes the transposed data from the shared memory tile back to the output matrix in global memory. Each thread writes a single element from the shared memory tile to the output matrix. By using shared memory, this optimized implementation reduces global memory accesses and exploits memory coalescence, resulting in improved performance compared to a naive transpose implementation.
This kernel achieved on NVIDIA V100 674 GB/s.
This is pretty close to the bandwidth achieved by the simple copy kernel, but there is one more thing to improve.
Shared memory is composed of banks. Each banks can service only one request at the time. Bank conflicts happen when more than 1 thread in a specific warp try to access data in bank. The bank conflicts are resolved by serializing the accesses resulting in less performance. In the above example when data is saved to the shared memory, each thread in the warp will save an element of the data in a different one. Assuming that shared memory has 16 banks after writing each bank will contain one column. At the last step when we write from the shared memory to the global memory each warp load data from the same bank. A simple way to avoid this is by just padding the temporary array.
const static int tile_dim = 16;

__global__ void transpose_SM_nobc_kernel(float *in, float *out, int width, int height) {
  __shared__ float tile[tile_dim][tile_dim+1];

  int x_tile_index = blockIdx.x * tile_dim;
  int y_tile_index = blockIdx.y * tile_dim;

  int in_index =(y_tile_index + threadIdx.y) * width + (x_tile_index + threadIdx.x);
  int out_index =(x_tile_index + threadIdx.y) * height + (y_tile_index + threadIdx.x);

  tile[threadIdx.y][threadIdx.x] = in[in_index];

  __syncthreads();

  out[out_index] = tile[threadIdx.x][threadIdx.y];
}
auto transposeKernel(sycl::handler &cgh, const float *in, float *out, int width, int height) {
   sycl::local_accessor<float, 1> tile{{tile_dim * (tile_dim + 1)}, cgh};
   return [=](sycl::nd_item<2> item) {
      int x_tile_index = item.get_group(1) * tile_dim;
      int y_tile_index = item.get_group(0) * tile_dim;
      int x_local_index = item.get_local_id(1);
      int y_local_index = item.get_local_id(0);
      int in_index = (y_tile_index + y_local_index) * width +
                     (x_tile_index + x_local_index);
      int out_index = (x_tile_index + y_local_index) * width +
                      (y_tile_index + x_local_index);

      tile[y_local_index * (tile_dim + 1) + x_local_index] = in[in_index];
      item.barrier();
      out[out_index] = tile[x_local_index * (tile_dim + 1) + y_local_index];
   };
}
By padding the array the data is slightly shifting it resulting in no bank conflicts. The effective bandwidth for this kernel is 697 GB/s.
Using sharing memory as a cache - In short
Shared memory can significantly improve performance in operations like matrix transpose.
Shared memory reduces global memory accesses and exploits the high bandwidth and low latency of shared memory
An optimized implementation utilizes shared memory, loads data coalescedly, and performs transpose operations
The optimized implementation uses a 2D grid of thread blocks and a shared memory tile size determined by a constant.
The kernel loads data from global memory into the shared memory tile and uses a synchronization barrier.
To avoid bank conflicts in shared memory, padding the temporary array is a simple solution.
Reductions
Reductions refer to operations in which the elements of an array are aggregated in a single value through operations such as summing, finding the maximum or minimum, or performing logical operations.
In the serial approach, the reduction is performed sequentially by iterating through the collection of values and accumulating the result step by step. This will be enough for small sizes, but for big problems this results in significant time spent in this part of an application. On a GPU, this approach is not feasible. Using just one thread to do this operation means the rest of the GPU is wasted. Doing reduction in parallel is a little tricky. In order for a thread to do work, it needs to have some partial result to use. If we launch, for example, a kernel performing a simple vector summation, sum[0]+=a[tid], with N threads we notice that this would result in undefined behaviour. GPUs have mechanisms to access the memory and lock the access for other threads while 1 thread is doing some operations to a given data via atomics, however this means that the memory access gets again to be serialized. There is not much gain.
We note that when doing reductions the order of the iterations is not important (barring the typical non-associative behavior of floating-point operations). Also we can we might have to divide our problem in several subsets and do the reduction operation for each subset separately. On the GPUs, since the GPU threads are grouped in blocks, the size of the subset based on that. Inside the block, threads can cooperate with each other, they can share data via the shared memory and can be synchronized as well. All threads read the data to be reduced, but now we have significantly less partial results to deal with. In general, the size of the block ranges from 256 to 1024 threads. In case of very large problems, after this procedure if we are left too many partial results this step can be repeated.
At the block level we still have to perform a reduction in an efficient way. Doing it serially means that we are not using all GPU cores (roughly 97% of the computing capacity is wasted). Doing it naively parallel using atomics, but on the shared memory is also not a good option. Going back back to the fact the reduction operations are commutative and associative we can set each thread to “reduce” two elements of the local part of the array. Shared memory can be used to store the partial “reductions” as shown below in the code:
#define tpb 512 // size in this case has to be known at compile time
// this kernel has to be launched with at least N/2 threads
__global__ void reduction_one(double x, double *sum, int N){
  int ibl=blockIdx.y+blockIdx.x*gridDim.y;
  int ind=threadIdx.x+blockDim.x*ibl;

  __shared__ double shtmp[2*tpb];
  shtmp[threadIdx.x]=0; // for sums we initiate with 0, for other operations should be different
  if(ind<N/2)
  {
     shtmp[threadIdx.x]=x[ind];
  }
  if(ind+N/2<N)
  {
     shtmp[threadIdx.x+tpb]=x[ind+N/2];
  }
  __syncthreads();
  for(int s=tpb;s>0;s>>=1){
    if(threadIdx.x<s){
       shtmp[threadIdx.x]+=shtmp[threadIdx.x+s];}
    __syncthreads();
  }
  if(threadIdx.x==0)
  {
    sum[ibl]=shtmp[0]; // each block saves its partial result to an array
    // atomicAdd(&sum[0], shene[0]); // alternatively could aggregate everything together at index 0. Only use when there not many partial sums left
  }
}
// SYCL has built-in sycl::reduction primitive, the use of which is demonstrated in
// the "Portable kernel models" chapter. Here is how the reduction can be implemented manually:

auto reductionKernel(sycl::handler &cgh, double *x, double *sum, int N) {
   sycl::local_accessor<double, 1> shtmp{{2*tpb}, cgh};
   return [=](sycl::nd_item<1> item) {
      int ibl = item.get_group(0);
      int ind = item.get_global_id(0);
      int tid = item.get_local_id(0);
      shtmp[tid] = 0;
      shtmp[tid + tpb] = 0;
      if (ind < N / 2) {
         shtmp[tid] = x[ind];
      }
      if (ind + N / 2 < N) {
         shtmp[tid + tpb] = x[ind + N / 2];
      }
      item.barrier();
      for (int s = tpb; s > 0; s >>= 1) {
         if (tid < s) {
             shtmp[tid] += shtmp[tid + s];
         }
         item.barrier();
      }
      if (tid == 0) {
         sum[ibl] = shtmp[0]; // each block saves its partial result to an array
         /*
           sycl::atomic_ref<double, sycl::memory_order::relaxed,
                          sycl::memory_scope::device,
                          sycl::access::address_space::global_space>
              ref(sum[0]);
           ref.fetch_add(shtmp[0]);
         */
         // Alternatively, we could aggregate everything together at index 0.
         // Only useful when there not many partial sums left and when the device supports
         // atomic operations on FP64/double operands.
      }
   };
}
In the kernel we have each GPU performing thread a reduction of two elements from the local portion of the array. If we have tpb GPU threads per block, we utilize them to store 2xtpb elements in the local shared memory. To ensure synchronization until all data is available in the shared memory, we employ the syncthreads() function.
Next, we instruct each thread to “reduce” the element in the array at threadIdx.x with the element at threadIdx.x+tpb. As this operation saves the result back into the shared memory, we once again employ syncthreads(). By doing this, we effectively halve the number of elements to be reduced.
This procedure can be repeated, but now we only utilize tpb/2 threads. Each thread is responsible for “reducing” the element in the array at threadIdx.x with the element at threadIdx.x+tpb/2. After this step, we are left with tpb/4 numbers to be reduced. We continue applying this procedure until only one number remains.
At this point, we can either “reduce” the final number with a global partial result using atomic read and write operations, or we can save it into an array for further processing.
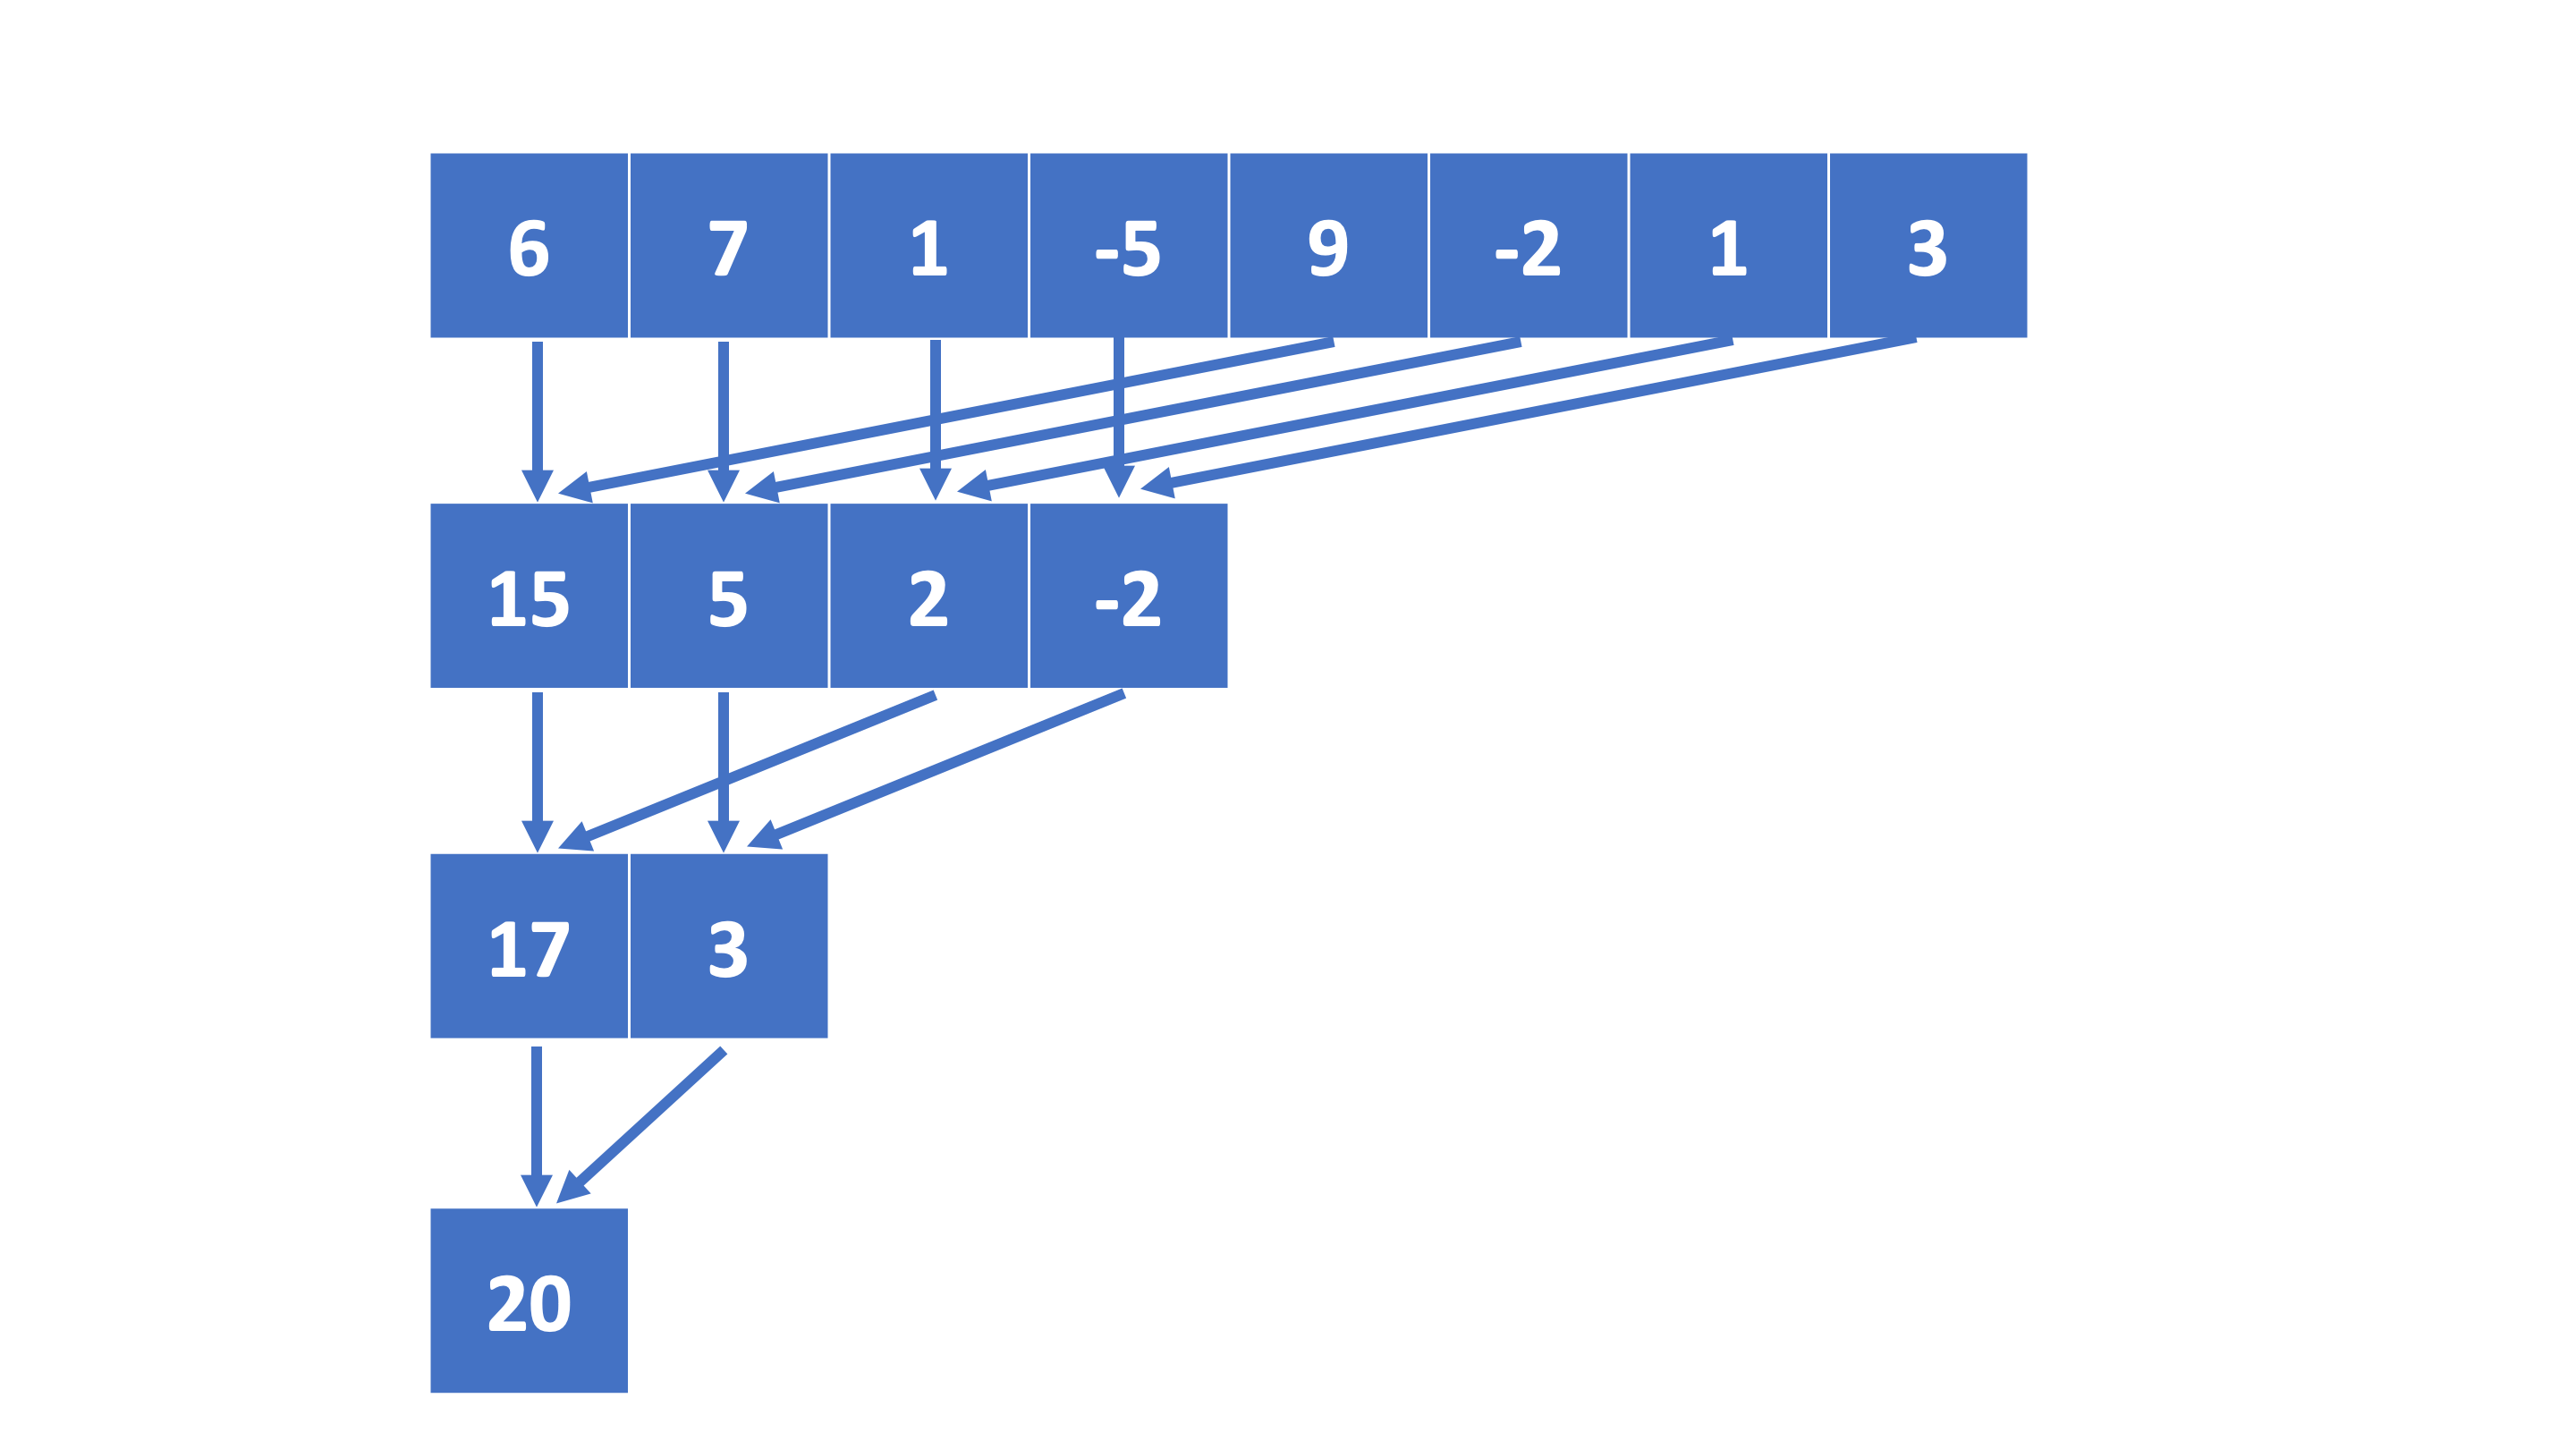
Schematic representation on the reduction algorithm with 8 GPU threads.
For a detail analysis of how to optimize reduction operations in CUDA/HIP check this presentation Optimizing Parallel Reduction in CUDA
Reductions - In short
Reductions refer to aggregating elements of an array into a single value through operations like summing, finding maximum or minimum, or performing logical operations.
Performing reductions sequentially in a serial approach is inefficient for large problems, while parallel reduction on GPUs offers better performance.
Parallel reduction on GPUs involves dividing the problem into subsets, performing reductions within blocks of threads using shared memory, and repeatedly reducing the number of elements (two per GPU thread) until only one remains.
CUDA/HIP Streams
Modern GPUs can overlap independent operations. They can do transfers between CPU and GPU and execute kernels in the same time, or they can execute kernels concurrently. CUDA/HIP streams are independent execution units, a sequence of operations that execute in issue-order on the GPU. The operations issue in different streams can be executed concurrently.
Consider the previous case of vector addition, which involves copying data from CPU to GPU, computations and then copying back the result to GPU. In this way nothing can be overlap.
We can improve the performance by dividin the problem in smaller independent parts. Let’s consider 5 streams and consider the case where copy in one direction and computation take the same amount of time.
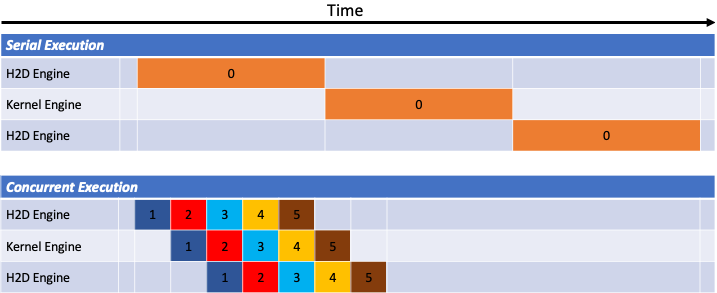
After the first and second stream copy data to the GPU, the GPU is practically occupied all time. We can see that significant performance improvements can be obtained by eliminating the time in which the GPU is idle, waiting for data to arrive from the CPU. This very useful for problems where there is often communication to the CPU because the GPU memory can not fit all the problem or the application runs in a multi-GPU set up and communication is needed often.
We can apply this to the vector addition problem above.
// Distribute kernel for 'n_streams' streams, and record each stream's timing
for (int i = 0; i < n_streams; ++i) {
  int offset = i * stream_size;
  cudaEventRecord(start_event[i], stream[i]); // stamp the moment when the kernel is submitted on stream i
  cudaMemcpyAsync( &Ad[offset],  &Ah[offset], N/n_streams*sizeof(float), cudaMemcpyHostToDevice, stream[i]);
  cudaMemcpyAsync( &Bd[offset],  &Bh[offset], N/n_streams*sizeof(float), cudaMemcpyHostToDevice, stream[i]);
  vector_add<<<gridsize / n_streams, blocksize, 0, stream[i]>>>(&Ad[offset], &Bd[offset], &Cd[offset], N/n_streams); //each call processes N/n_streams elements
  cudaMemcpyAsync( &Ch[offset],  &Cd[offset], N/n_streams*sizeof(float), cudaMemcpyDeviceToHost, stream[i]);
  cudaEventRecord(stop_event[i], stream[i]);  // stamp the moment when the kernel on stream i finished
}
// Distribute kernel for 'n_streams' streams, and record each stream's timing
for (int i = 0; i < n_streams; ++i) {
  int offset = i * (N/stream_size);
  hipEventRecord(start_event[i], stream[i]); // stamp the moment when the kernel is submitted on stream i
  hipMemcpy(d_in, matrix_in.data(), width * height * sizeof(float),
         hipMemcpyHostToDevice);
  hipMemcpyAsync( &Ad[offset],  &Ah[offset], N/n_streams*sizeof(float), hipMemcpyHostToDevice, stream[i]);
  hipMemcpyAsync( &Bd[offset],  &Bh[offset], N/n_streams*sizeof(float), hipMemcpyHostToDevice, stream[i]);
  vector_add<<<gridsize / n_streams, blocksize, 0, stream[i]>>>(&Ad[offset], &Bd[offset], &Cd[offset], N/n_streams); //each call processes N/n_streams elements
  hipMemcpyAsync( &Ch[offset],  &Cd[offset], N/n_streams*sizeof(float), hipMemcpyDeviceToHost, stream[i]);
  hipEventRecord(stop_event[i], stream[i]);  // stamp the moment when the kernel on stream i finished
}
...
Instead of having one copy to gpu, one execution of the kernel and one copy back, we now have several of these calls independent of each other.
Note that even when streams are not explicitly used it si possible to launch all the GPU operations asynchronous and overlap CPU operations (such I/O) and GPU operations. In order to learn more about how to improve performance using streams check the NVIDIA blog How to Overlap Data Transfers in CUDA C/C++.
Streams - In short
CUDA/HIP streams are independent execution contexts on the GPU that allow for concurrent execution of operations issued in different streams.
Using streams can improve GPU performance by overlapping operations such as data transfers between CPU and GPU and kernel executions.
By dividing a problem into smaller independent parts and utilizing multiple streams, the GPU can avoid idle time, resulting in significant performance improvements, especially for problems with frequent CPU communication or multi-GPU setups.
Pros and cons of native programming models
There are advantages and limitations to CUDA and HIP:
- CUDA Pros:
Performance Boost: CUDA is designed for NVIDIA GPUs and delivers excellent performance.
Wide Adoption: CUDA is popular, with many resources and tools available.
Mature Ecosystem: NVIDIA provides comprehensive libraries and tools for CUDA programming.
- HIP Pros:
Portability: HIP is portable across different GPU architectures.
Open Standards: HIP is based on open standards, making it more accessible.
Growing Community: The HIP community is growing, providing more resources and support.
- Cons:
Exclusive for GPUs
Vendor Lock-in: CUDA is exclusive to NVIDIA GPUs, limiting compatibility.
Learning Curve: Both CUDA and HIP require learning GPU programming concepts.
Limited Hardware Support: HIP may face limitations on older or less common GPUs.
Keypoints
CUDA and HIP are two GPU programming models
Memory optimizations are very important
Asynchronous launching can be used to overlap operations and avoid idle GPU