High-level language support
Questions
Can I port code in high-level languages to run on GPUs?
Objectives
Get an overview of libraries for GPU programming in Python and Julia
Instructor note
25 min teaching
15 min exercises
Julia
Julia has first-class support for GPU programming through the following packages that target GPUs from all three major vendors:
CUDA.jl for NVIDIA GPUs
AMDGPU.jl for AMD GPUs
oneAPI.jl for Intel GPUs
Metal.jl for Apple M-series GPUs
CUDA.jl is the most mature, AMDGPU.jl is somewhat behind but still
ready for general use, while oneAPI.jl and Metal.jl are functional but might
contain bugs, miss some features and provide suboptimal performance.
The APIs of these libraries are completely analogous and translation between them is normally straightforward. The libraries offer both user-friendly high-level abstractions (the array interface and higher-level abstractions) that require little programming effort, and a lower level approach for writing kernels for fine-grained control.
Installing these packages is done with the Julia package manager:
Installing CUDA.jl:
using Pkg
Pkg.add("CUDA")
Installing AMDGPU.jl:
using Pkg
Pkg.add("AMDGPU")
Installing oneAPI.jl:
using Pkg
Pkg.add("oneAPI")
Installing Metal.jl:
using Pkg
Pkg.add("Metal")
To use the Julia GPU stack, one needs to have the relevant GPU drivers and programming toolkits installed. GPU drivers are already installed on HPC systems while on your own machine you will need to install them yourself (see e.g. these instructions from NVIDIA). Programming toolkits for CUDA can be installed automatically through Julia’s artifact system upon the first usage:
using CUDA
CUDA.versioninfo()
The array interface
GPU programming with Julia can be as simple as using a different array type
instead of regular Base.Array arrays:
CuArrayfrom CUDA.jl for NVIDIA GPUsROCArrayfrom AMDGPU.jl for AMD GPUsoneArrayfrom oneAPI.jl for Intel GPUsMtlArrayfrom Metal.jl for Apple GPUs
These array types closely resemble Base.Array which enables
us to write generic code which works on both types.
The following code copies an array to the GPU and executes a simple operation on the GPU:
using CUDA

A_d = CuArray([1,2,3,4])
A_d .+= 1
using AMDGPU

A_d = ROCArray([1,2,3,4])
A_d .+= 1
using oneAPI

A_d = oneArray([1,2,3,4])
A_d .+= 1
using Metal

A_d = MtlArray([1,2,3,4])
A_d .+= 1
Moving an array back from the GPU to the CPU is simple:
A = Array(A_d)
Let’s have a look at a more realistic example: matrix multiplication. We create two random arrays, one on the CPU and one on the GPU, and compare the performance using the BenchmarkTools package:
using BenchmarkTools
using CUDA

A = rand(2^9, 2^9);
A_d = CuArray(A);

@btime $A * $A;
@btime CUDA.@sync $A_d * $A_d;
using BenchmarkTools
using AMDGPU

A = rand(2^9, 2^9);
A_d = ROCArray(A);

@btime $A * $A;
@btime begin
   $A_d * $A_d;
   AMDGPU.synchronize()
end
using BenchmarkTools
using oneAPI

A = rand(2^9, 2^9);
A_d = oneArray(A);

@btime $A * $A;
@btime $A_d * $A_d;
using BenchmarkTools
using Metal

A = rand(2^9, 2^9);
A_d = MtlArray(A);

@btime $A * $A;
@btime $A_d * $A_d;
Vendor libraries
Support for using GPU vendor libraries from Julia is currently most mature on
NVIDIA GPUs. NVIDIA libraries contain precompiled kernels for common
operations like matrix multiplication (cuBLAS), fast Fourier transforms
(cuFFT), linear solvers (cuSOLVER), etc. These kernels are wrapped
in CUDA.jl and can be used directly with CuArrays:
# create a 100x100 Float32 random array and an uninitialized array
A = CUDA.rand(2^9, 2^9);
B = CuArray{Float32, 2}(undef, 2^9, 2^9);

# regular matrix multiplication uses cuBLAS under the hood
A * A

# use LinearAlgebra for matrix multiplication
using LinearAlgebra
mul!(B, A, A)

# use cuSOLVER for QR factorization
qr(A)

# solve equation A*X == B
A \ B

# use cuFFT for FFT
using CUDA.CUFFT
fft(A)
AMDGPU.jl currently supports some of the ROCm libraries:
rocBLAS for BLAS support
rocFFT for FFT support
rocRAND for RNG support
MIOpen for DNN support
Higher-order abstractions
A powerful way to program GPUs with arrays is through Julia’s higher-order array
abstractions. The simple element-wise addition we saw above, a .+= 1, is
an example of this, but more general constructs can be created with
broadcast, map, reduce, accumulate etc:
broadcast(A) do x
    x += 1
end
map(A) do x
    x + 1
end
reduce(+, A)
accumulate(+, A)
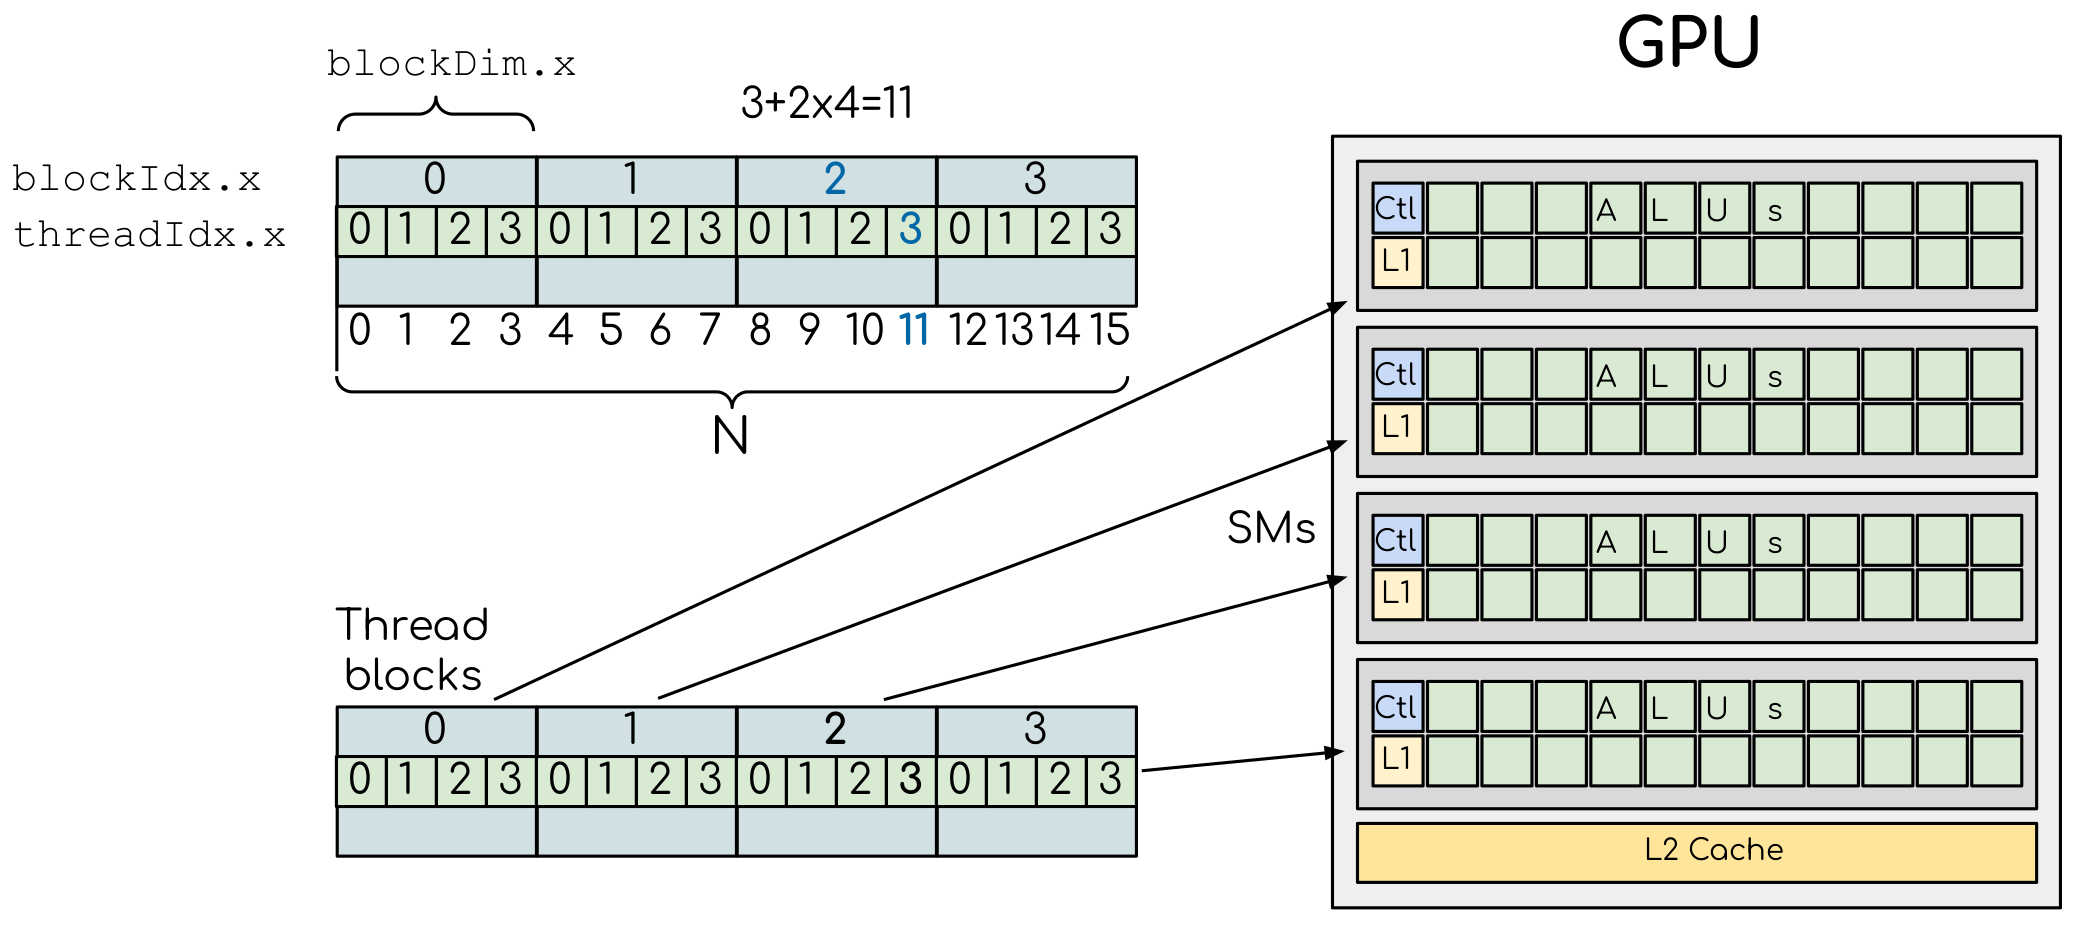
Writing your own kernels
Not all algorithms can be made to work with the higher-level abstractions
in CUDA.jl. In such cases it’s necessary to explicitly write our own GPU kernel.
Similarly to writing kernels in CUDA or HIP, we use a special function to
return the index of the GPU thread which executes it (e.g., threadIdx().x for NVIDIA
and workitemIdx().x for AMD), and two additional functions to parallelise over multiple blocks
(e.g., blockDim().x() and blockIdx().x() for NVIDIA, and workgroupDim().x() and
workgroupIdx().x() for AMD).
Here’s an example of vector addition kernels for NVIDIA, AMD, Intel and Apple GPUs:
using CUDA

function vadd!(C, A, B)
    i = threadIdx().x + (blockIdx().x - 1) * blockDim().x
    if i <= length(A)
        @inbounds C[i] = A[i] + B[i]
    end
    return
end

A, B = CUDA.ones(2^9)*2, CUDA.ones(2^9)*3;
C = similar(A);

nthreads = 256
# smallest integer larger than or equal to length(A)/threads
numblocks = cld(length(A), nthreads)

# run using 256 threads
@cuda threads=nthreads blocks=numblocks vadd!(C, A, B)

@assert all(Array(C) .== 5.0)
using AMDGPU

function vadd!(C, A, B)
    i = workitemIdx().x + (workgroupIdx().x - 1) * workgroupDim().x
    if i <= length(A)
        @inbounds C[i] = A[i] + B[i]
    end
    return
end

A, B = ROCArray(ones(2^9)*2), ROCArray(ones(2^9)*3);
C = similar(A);

nthreads = 256
# smallest integer larger than or equal to length(A)/threads
numblocks = cld(length(A), nthreads)

# run using 256 threads
@roc threads=nthreads blocks=numblocks vadd!(C, A, B)

@assert all(Array(C) .== 5.0)
using oneAPI
# WARNING: this is still untested on Intel GPUs
function vadd!(C, A, B)
    i = get_global_id()
    if i <= length(a)
        c[i] = a[i] + b[i]
    end
    return
end

A, B = oneArray(ones(2^9)*2), oneArray(ones(2^9)*3);
C = similar(A);

nthreads = 256
# smallest integer larger than or equal to length(A)/threads
numgroups = cld(length(a),256)

@oneapi items=nthreads groups=numgroups vadd!(c, a, b)

@assert all(Array(C) .== 5.0)
using Metal

function vadd!(C, A, B)
    i = thread_position_in_grid_1d()
    if i <= length(A)
        @inbounds C[i] = A[i] + B[i]
    end
    return
end

A, B = MtlArray(ones(Float32, 2^9)*2), MtlArray(Float32, ones(2^9)*3);
C = similar(A);

nthreads = 256
# smallest integer larger than or equal to length(A)/threads
numblocks = cld(length(A), nthreads)

# run using 256 threads
@metal threads=nthreads grid=numblocks vadd!(C, A, B)

@assert all(Array(C) .== 5.0)
Restrictions in kernel programming
Within kernels, most of the Julia language is supported with the exception of functionality that requires the Julia runtime library. This means one cannot allocate memory or perform dynamic function calls, both of which are easy to do accidentally!
1D, 2D and 3D
CUDA.jl and AMDGPU.jl support indexing in up to 3 dimensions (x, y and z, e.g.
threadIdx().x and workitemIdx().x). This is convenient
for multidimensional data where thread blocks can be organised into 1D, 2D or 3D arrays of
threads.
Python
There has been a lot of progress in GPU programming using Python and the ecosystem is still evolving. There are a couple of options available to work with GPU.
CuPy
CuPy is a NumPy/SciPy-compatible data array library used on GPU. It has been developed for NVIDIA GPUs but as experimental support for AMD GPUs. CuPy has a highly compatible interface with NumPy and SciPy. As stated on its official website, “All you need to do is just replace numpy and scipy with cupy and cupyx.scipy in your Python code.” If you know NumPy, CuPy is a very easy way to get started on the GPU.
cuDF
RAPIDS is a high level packages collections which implement CUDA functionalities and API with Python bindings. It only supports NVIDIA GPUs. cuDF belongs to RAPIDS and is the library for manipulating data frames on GPU. cuDF provides a pandas-like API, so if you are familiar with Pandas, you can accelerate your work without knowing too much CUDA programming.
PyCUDA
PyCUDA is a Python programming environment for CUDA. It allows users to access to NVIDIA’s CUDA API from Python. PyCUDA is powerful library but only runs on NVIDIA GPUs. Knowledge of CUDA programming is needed.
Numba
Numba allows users to just-in-time (JIT) compile Python code to run fast on CPUs, but can also be used for JIT compiling for GPUs. In the following we will focus on using Numba, which supports GPUs from both NVIDIA and AMD.
AMD support deprecated
Numba supported AMD GPUs up until version 0.53 but has since deprecated the support.
Numba supports GPU programming by directly compiling a restricted subset of Python code into kernels and device functions following the execution model. Kernels written in Numba appear to have direct access to NumPy arrays. NumPy arrays are transferred between the CPU and the GPU automatically.
ufunc (gufunc) decorator
Using ufuncs (and generalized ufuncs) is the easiest way to run on a GPU with Numba,
and it requires minimal understanding of GPU programming. Numba @vectorize
will produce a ufunc-like object. This object is a close analog but not fully compatible
with a regular NumPy ufunc. Generating a ufunc for GPU requires the explicit
type signature and target attribute.
Examples
Demo: Numba ufunc
Let’s look at a simple mathematical problem:
import math

def f(x,y):
    return math.pow(x,3.0) + 4*math.sin(y)
import math
import numba

@numba.vectorize([numba.float64(numba.float64, numba.float64)], target='cpu')
def f_numba_cpu(x,y):
    return math.pow(x,3.0) + 4*math.sin(y)
import math
import numba

@numba.vectorize([numba.float64(numba.float64, numba.float64)], target='cuda')
def f_numba_gpu(x,y):
    return math.pow(x,3.0) + 4*math.sin(y)
Let’s benchmark:
import numpy as np
x = np.random.rand(10000000)
res = np.random.rand(10000000)
%%timeit -r 1
for i in range(10000000):
    res[i]=f(x[i], x[i])
    # 6.75 s ± 0 ns per loop (mean ± std. dev. of 1 run, 1 loop each)
import numpy as np
import numba

x = np.random.rand(10000000)
res = np.random.rand(10000000)

%timeit res=f_numba_cpu(x, x)
# 734 ms ± 435 µs per loop (mean ± std. dev. of 7 runs, 1 loop each)
import numpy as np
import numba

x = np.random.rand(10000000)
res = np.random.rand(10000000)

%timeit res=f_numba_gpu(x, x)
# 78.4 ms ± 6.71 ms per loop (mean ± std. dev. of 7 runs, 1 loop each)
Numba @vectorize is limited to scalar arguments in the core function, for multi-dimensional arrays arguments,
@guvectorize is used. Consider the following example which does matrix multiplication.
Warning
One should never implement things like matrix multiplication by oneself since there are plenty of highly optimized libraries available!
Numba gufunc
import numpy as np

def matmul_cpu(A,B,C):
    for i in range(A.shape[0]):
        for j in range(B.shape[1]):
            tmp=0.0
            for k in range(B.shape[0]):
                tmp += A[i, k] * B[k, j]
            C[i,j] += tmp
import numpy as np
import numba

#@numba.guvectorize(['(float64[:,:], float64[:,:], float64[:,:])'], '(m,l),(l,n)->(m,n)', target='cpu')
@numba.guvectorize([numba.void(numba.float64[:,:], numba.float64[:,:], numba.float64[:,:])], '(m,l),(l,n)->(m,n)', target='cpu')
def matmul_numba_cpu(A,B,C):
    for i in range(A.shape[0]):
        for j in range(B.shape[1]):
            tmp=0.0
            for k in range(B.shape[0]):
                tmp += A[i, k] * B[k, j]
            C[i,j] += tmp
import numpy as np
import numba

#@numba.guvectorize(['(float64[:,:], float64[:,:], float64[:,:])'], '(m,l),(l,n)->(m,n)', target='cuda')
@numba.guvectorize([numba.void(numba.float64[:,:], numba.float64[:,:], numba.float64[:,:])], '(m,l),(l,n)->(m,n)', target='cuda')
def matmul_numba_gpu(A,B,C):
    for i in range(A.shape[0]):
        for j in range(B.shape[1]):
            tmp=0.0
            for k in range(B.shape[0]):
                tmp += A[i, k] * B[k, j]
            C[i,j] += tmp
Benchmark:
import numpy as np
import numba
N = 50
A = np.random.rand(N,N)
B = np.random.rand(N,N)
C = np.random.rand(N,N)
%timeit matmul_numba_cpu(A,B,C)
import numpy as np
import numba
N = 50
A = np.random.rand(N,N)
B = np.random.rand(N,N)
C = np.random.rand(N,N)
%timeit matmul_numba_gpu(A,B,C)
Note
Numba automatically did a lot of things for us:
Memory was allocated on GPU
Data was copied from CPU and GPU
The kernel was configured and launched
Data was copied back from GPU to CPU
Using ufuncs (or gfuncs) for GPU processing can be straightforward, but this approach may not always yield optimal performance due to automatic handling of data transfer to and from the GPU, as well as kernel launching. Additionally, in practice, not every function can be constructed as a ufunc.
To gain greater control and flexibility, one may need to craft their own kernels and manually manage data transfer. Refer to the Python for HPDA resource linked below for guidance on implementing such techniques using Numba.
Exercises
Play around yourself
Are you a Julian or a Pythonista? Maybe neither, but take a pick between Python and Julia and play around with the code examples provided above.
You can find instructions for running Julia on LUMI and Python on Google Colab in the Setup episode.